The WhiteHat Sentinel Plugin for JIRA®
The WhiteHat Sentinel Plugin for JIRA® is designed to integrate Continuous Dynamic services tightly with JIRA®; the plugin provides a seamless interface within JIRA® that will automatically sync vulnerabilities from Sentinel with your JIRA® application.
As vulnerabilities are discovered and added to the Continuous Dynamic Portal, they are pulled into JIRA® and issues are created to get these vulnerabilities into the JIRA® system for remediation. DAST vulnerabilities can be retested and developers can use the Portal’s Ask A Question feature directly from the issue in JIRA® as though they were in the Portal.
Requirements
Black Duck currently supports JIRA® Server 6.x - 7.x on Windows 7 or Ubuntu 14. The plugin is available from [LINK].
Note that you must be logged in as a JIRA® Administrator with global permissions in order to install or configure the plugin.
Installation
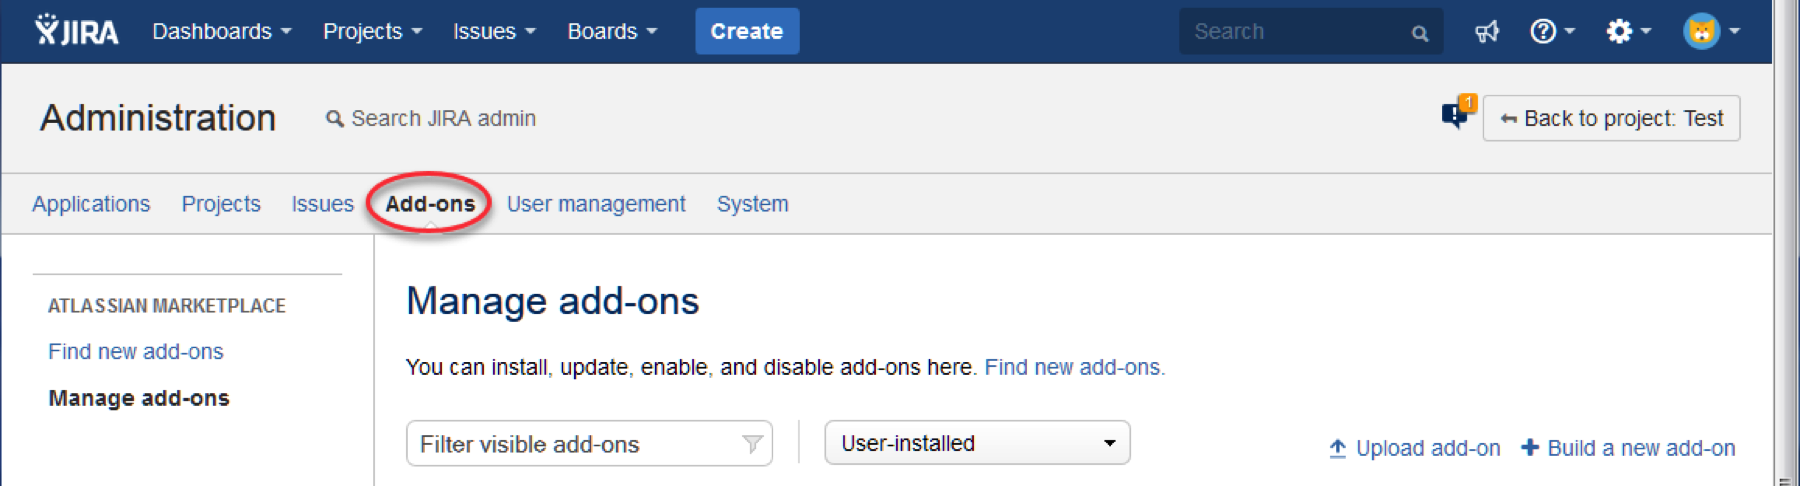
To install this plugin, log in to JIRA® with an administrator account.
-
Click on Add-ons under JIRA® Administration
-
Go to Manage Add-ons, and select the "Upload Add-on" option
-
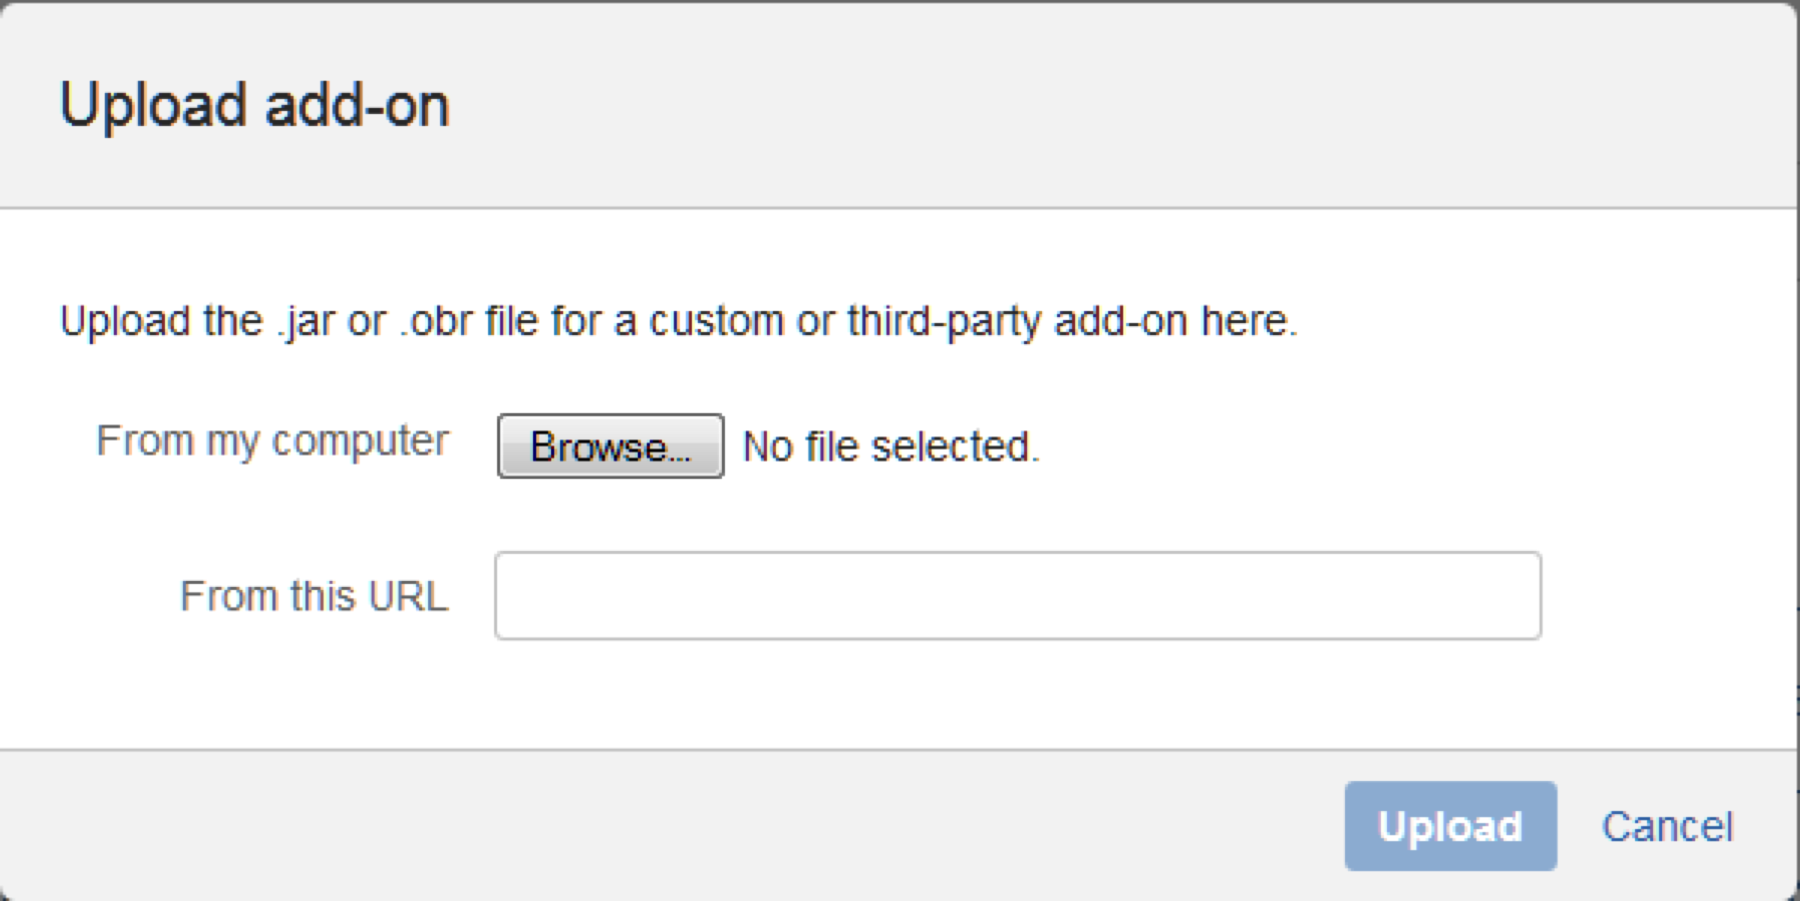
Select the downloaded file
(e.g.WhiteHat_Sentinel_JIRA_Plugin-v3.0.0.jar) -
Click on "Upload" and the plugin will begin installation:
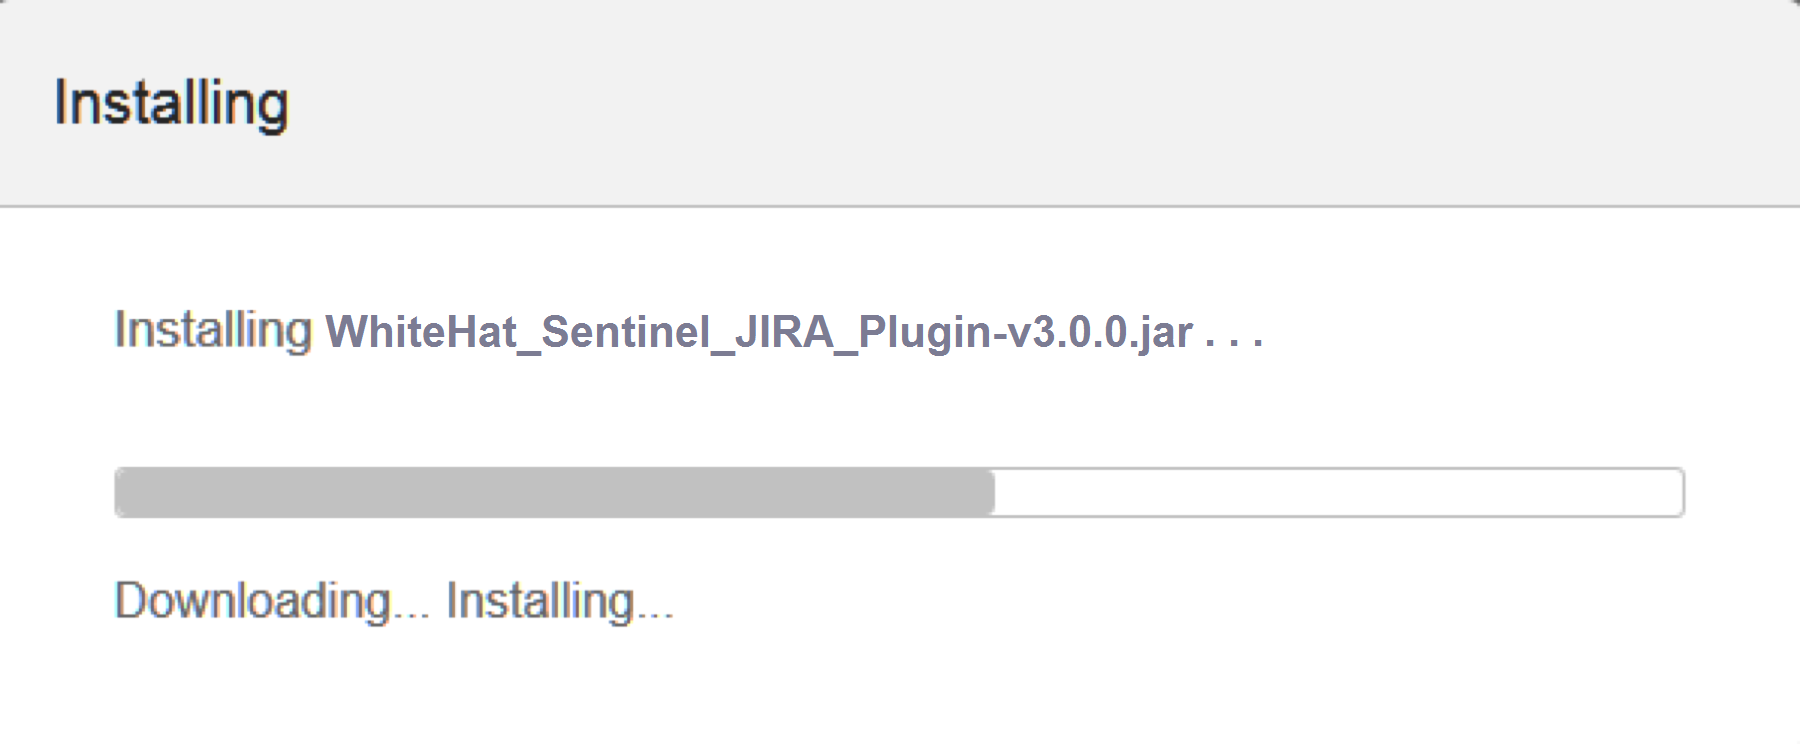
The installation will take a few minutes to complete; once installation is complete, refresh the page and you will see the WhiteHat Sentinel Plugin for JIRA® add-on listed under "User-installed Add-ons."
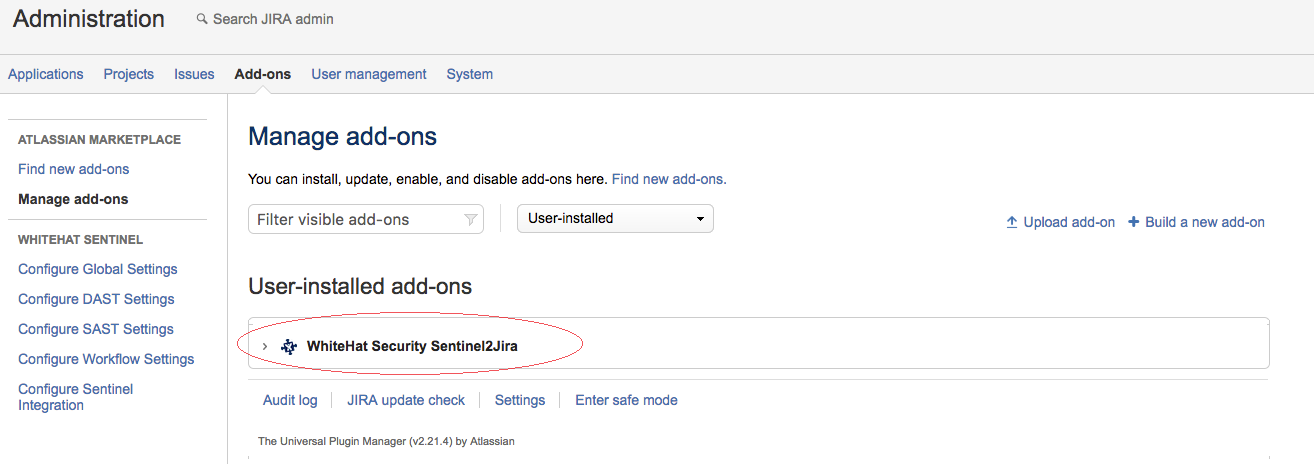
Click on the ">" arrow next to the add-on name to manage it or to see more details.
Configuring the WhiteHat Sentinel Plugin for JIRA®
Once the plugin has been installed, return to and refresh your administration page. Under the Plug-in section you will see an area labeled WhiteHat Sentinel, similar to this screen shot:
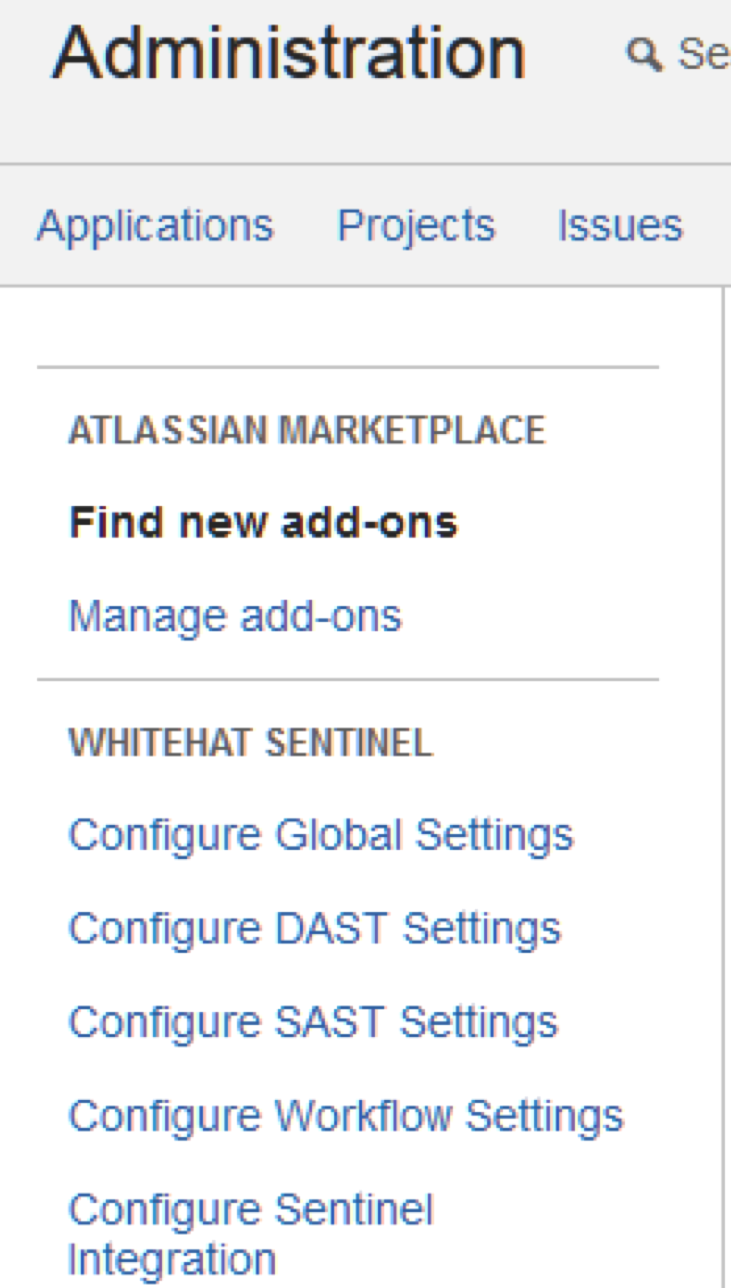
You will see there are five links:
-
Configure Global Settings allows you to configure overall plugin settings.
-
Configure DAST or SAST Settings allows you to configure the interactions between the plugin and the Sentinel services (Continuous Dynamic - DAST - or Sentinel Source - SAST).
-
Configure Workflow Settings allows you to configure the JIRA® workflow that will be used to create or transition your JIRA® issues.
-
Configure Sentinel Integration allows you to manage your integration and view logs.
Configure Global Settings
The Global Configurations section has five components:
Authenticate WhiteHat Sentinel Credentials
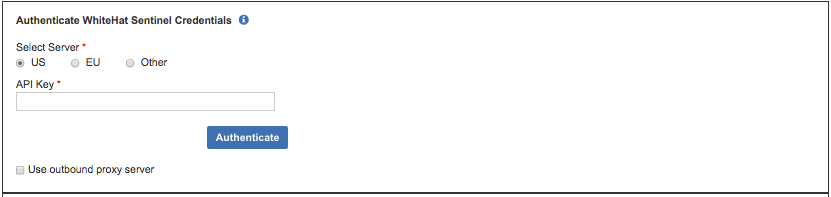
Select a US, EU, or Other server and enter your API key; click on "Authenticate" to validate your connection. Note that a valid API key must be entered before the plugin can be used.
| If you will be using an outbound proxy server, please select that checkbox. You will be asked to provide the Proxy Host name and Port, and a username and password to log in to that proxy server. |
Next, you will configure your tickets, vulnerability content, and notification settings. You can also configure advanced settings.
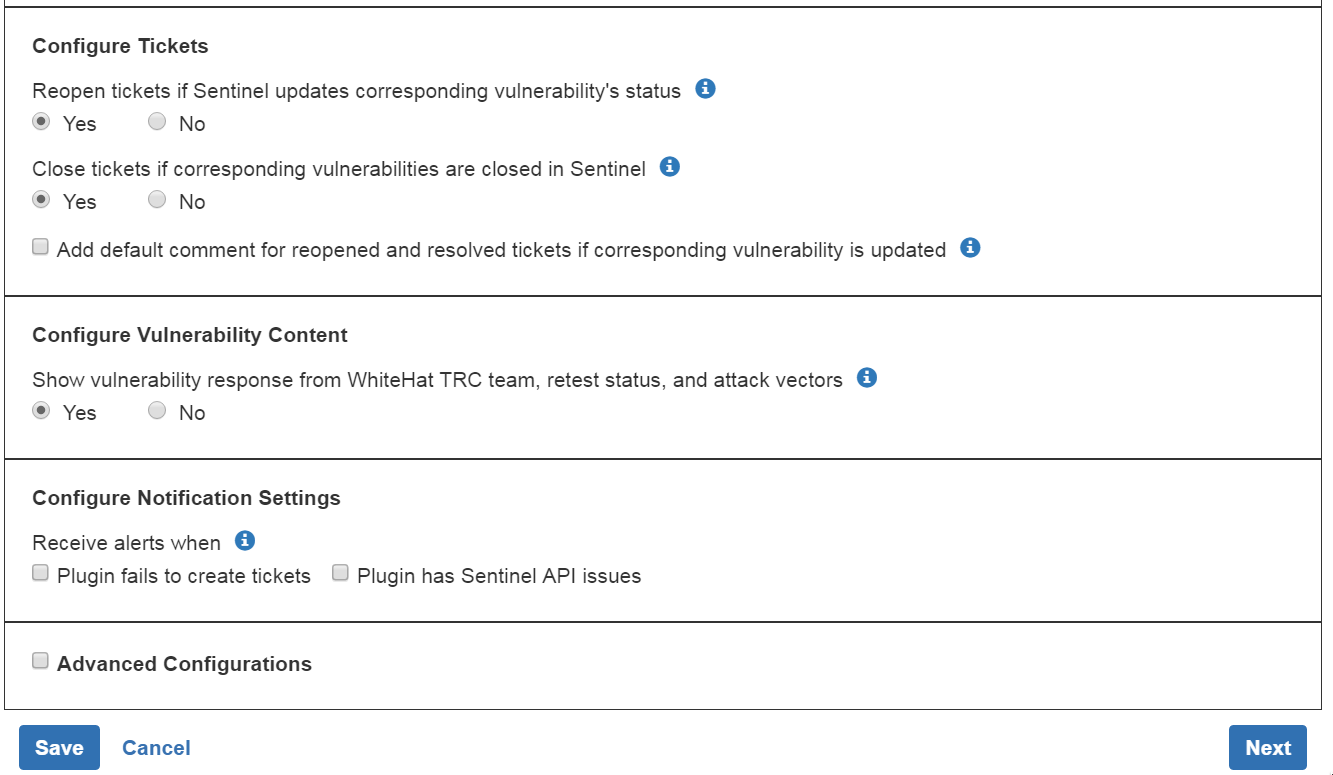
Configure JIRA® Tickets
Use the radio buttons to indicate whether or not your JIRA® tickets should be automatically reopened or closed your when the status of the vulnerability in the Portal changes.
If you want to add a pre-set comment for any closed or re-opened tickets, check the "Add default comment" box and indicate the text you want to use (or use the default text).
Configure Vulnerability Content
Use the radio buttons to indicate whether you want to see any responses from the Black Duck Threat Research Center, retest status for a vulnerability, or any notes or tags associated with the vulnerability.
Configure Notification Settings
Enter a comma-delimited list of the emails that should receive alerts; below that, select when alerts should be received (if the plugin fails to create a JIRA® ticket or if there are issues with the Sentinel API).
Advanced Configurations
If you want to use the advanced configurations, select the "Advanced Configurations" checkbox.
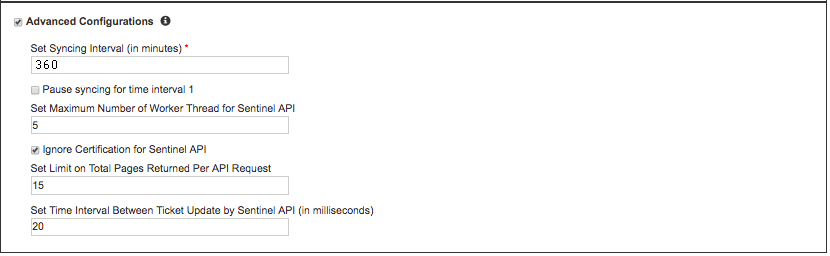
Set Synching Interval (in minutes) allows you to set the interval at which Sentinel and JIRA® will be synched.
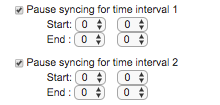
Pause Synching for time interval allows you to set one or two daily time intervals during which synching will be paused.
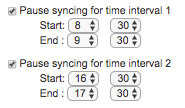
If you select the "Pause syncing for time interval 1" checkbox, you will see the start and end time boxes for the first and, optionally, second period during which you want to pause synchronization.
Each start and end time should be entered in hours (0-23) and minutes (0-59). For instance, to pause synchronization between 8:30 and 9:30 a.m. and between 4:30 and 5:30 p.m., your entry should look like this:
Set Maximum Number of Worker Threads allows you to cap the number of API requests that can be in process at once.
Ignore Certification for Sentinel API allows you to ignore any certificates installed on your server.
Set Limit on Total Pages Returned per API Request limits the number of tickets that can be created from a single request.
Set Time Interval Between Ticket Updates allows you to set the minimum interval (in milliseconds) between ticket updates from the Sentinel API.
When you have completed the global configuration process, click on "Save" and then click on "Next" to go to the next section. If you are not confident of your choices, you can also click on "Cancel."
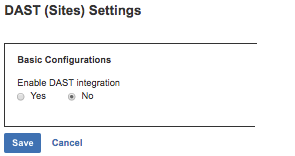
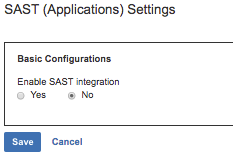
Configure DAST or SAST Settings
Select "Configure DAST Settings" or "Configure SAST Settings" to set your default reporter and assignee, map assets or groups to JIRA® projects, and map ticket priority to Sentinel ratings. The settings for each are broadly comparable, but some specifics will be called out where relevant.
To set these values, select the "Yes" radio button under "Enable DAST integration" or "Enable SAST integration. Until the radio button is set to Yes, no other options will be available.
Once you have selected "Yes," you will see the configuration settings. This will allow you to:
-
Set the default Reporter for JIRA® tickets generated by the plugin
-
Set the default Assignee for JIRA® tickets generated by the plugin based on asset-and-project combinations
-
Map Vulnerability Ratings to JIRA® Priorities
-
Configure JIRA® Tickets
Basic Configuration
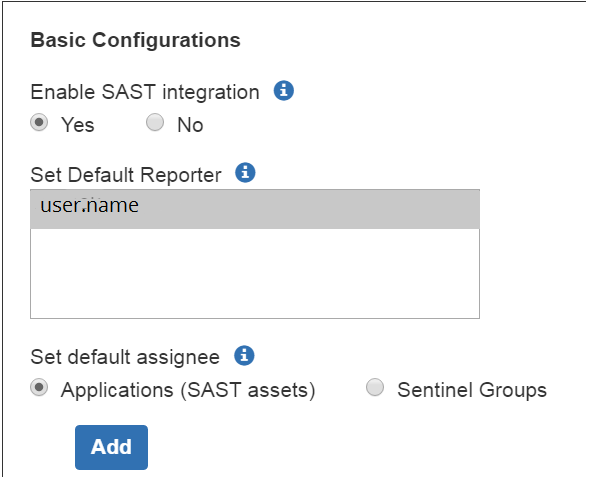
Select the default reporter from the listed users. The default reporter will be listed as the reporter for all the JIRA® tickets created by the plugin.
Next, you can set the default JIRA® assignee for a given asset or group of assets.
Set the default JIRA® assignee for a given asset (site or application) and associated JIRA® project. (Note that this will map these assets to the JIRA® project(s) in question.)
To set default assignees by group rather than asset, select the "Sentinel Groups" radio button. In this case, all assets in a group will be associated to the JIRA® project selected. (Only one Group can be utilized in this way.)
To add additional asset mappings, click on "Add."
| Only one user can be selected as the default Reporter in JIRA®. Only one user can be set as the default assignee to any given asset-project mapping. |
Mapping Vulnerability Ratings to JIRA® Priorities
Vulnerability ratings for Source (SAST) Vulnerabilities will all automatically use the WhiteHat Advanced Rating Methodology, which is based on OWASP ratings. Vulnerability ratings for Dynamic (DAST) Vulnerabilities may use either the WhiteHat Advanced Rating Methodology or the Legacy Methodology.
For DAST configuration, use the radio buttons to indicate whether you are mapping Legacy Ratings or Advanced Ratings to your JIRA® priorities. (Please see Understanding Your Rating Methodology for more information on ratings.)
The default mapping will associate the most severe rating with the highest JIRA® priority, and run down from there. You can change this mapping using the drop-down lists to the right. If you do not select a given rating mapping, no JIRA® ticket will be created for it.
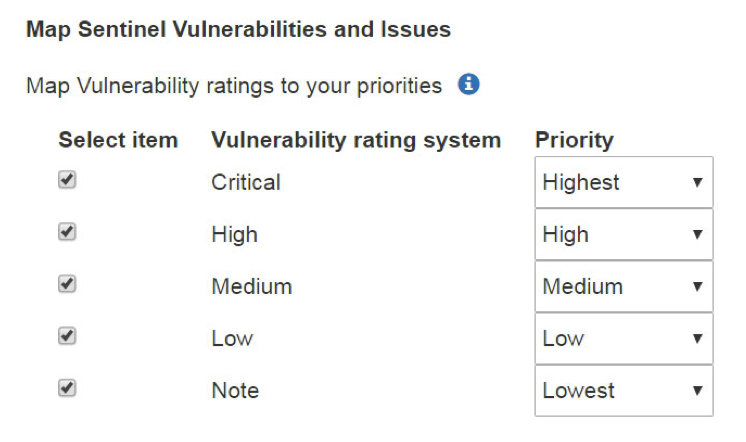
In the example above, JIRA® tickets will be created for vulnerabilities with any rating; Critical vulnerabilities will receive the highest JIRA® priority, High risk vulnerabilities will receive a JIRA® priority of High, and Medium risk vulnerabilities will receive a JIRA® priority of Medium. Vulns with a rating of "Low" will receive a JIRA® priority of Low, and vulns with a rating of "Note" will receive a JIRA® priority of Lowest.
| If a given rating value is not checked, no ticket will be created for it. |
In addition to limiting what vulnerabilities result in JIRA® tickets based on risk, it is also possible to limit vulnerabilities that will result in JIRA® tickets based on the Sentinel tags associated to the vulnerability. To do this, click on "Add" under "Allow vulnerabilities that have these tags:"
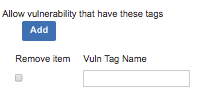
Once you click on "Add," you will see a checkbox for "Remove item" and a text field where you can enter the vuln tag name. Enter one vuln tag name in that text field; if there are other tags that should be used to create JIRA® tickets, click "Add" again to list additional tags. To remove tags, click on the checkbox next to the tag in question.
| If you add any tags to be used to create JIRA®tickets, *only * vulnerabilities that have at least one of the listed tags in the Portal will be used to create JIRA®issues. |
Set Vulnerability Viewing Authorizations for Dynamic (DAST) Vulns
You can authorize JIRA® groups to view vulnerability content for vulnerabilities discovered via dynamic (DAST) testing, including retest status, tags, and Black Duck Threat Research Center engineers' responses to questions. This information will be made available in the JIRA® ticket under "WhiteHat Sentinel Vulnerability Management."
| This must also be enabled in the Global Settings; please see Configure Vulnerability Content for additional information. |
Configure JIRA® Tickets
You can choose to import closed vulnerabilities by checking the
"Import Closed Vulnerabilities" checkbox:

You can also choose to customize the ticket summary, as shown above, and/or the description, as shown below:
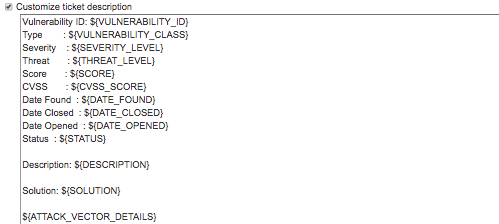
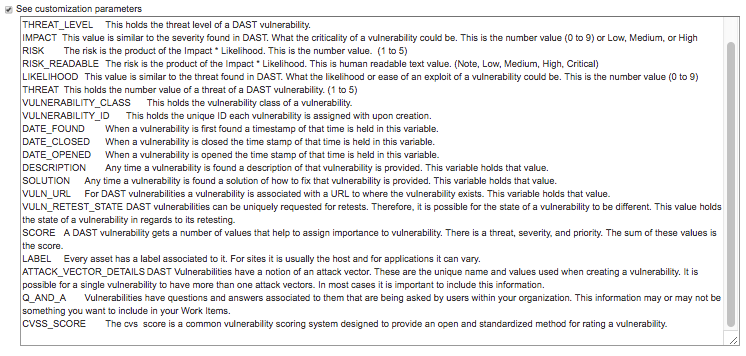
To see customization parameters (which can be used in either the summary or the description, or in the JIRA® custom fields in the XML Workflow configuration), check the checkbox next to "See Customization Parameters".
When you have completed the DAST or SAST configuration process, click on "Save" and then click on "Next" to go to the next section. If you are not confident of your choices, you can also click on "Cancel."
Sentinel Workflow Settings
This section will define how issues will be created, reopened and closed. The workflow scheme in JIRA® is highly configurable, and it can be very difficult to account for all possible statuses and transitions created by an organization; this section allows you to define what each status should do based on the action of creating, closing, or reopening an issue in JIRA®. You need to select the workflow that is associated to your projects (as defined in DAST and SAST configurations) and define the pertinent information. Please follow these steps to configure your workflow.
-
Select the project workflow that you would like to use from the list.
-
Click on Build Default Workflow Template button to generate a template workflow XML file. The XML will be generated under the XML Workflow Configuration Section, and will be a starting point for the workflow configuration.
-
Under XML Workflow Configuration, provide the Project Name and Key values. This will be the name and key of the JIRA® project that you would like to use for issues. This will be something similar to:
<workflows>
  <workflow name="JIRA Workflow (jira)">
    <projects>
      <project name= "projectname" key= "projectkey"></project>
</projects>-
Define the transition_action id for each status of the workflow. The first transition_action id will be under “Create Issue (Integration Defined)” status, and will be something similar to this:
<status name="Create Issue (Integration Defined)">
  <transition type="Create">
    <transition_action id="YOURID">
      <!-- <field name="YOURFIELDNAME" values="YOURVALUE"></fields> -->
    </transition_action>
  </transition>
</status>
The JIRA® workflow has a list of all transitions that are possible for a given Status, which you can see in the workflow editor text view. When you have defined the XML workflow configuration, click "Save Configuration" to save.
Sentinel Integration
This page allows user to start or stop integration or view the plugin log files.
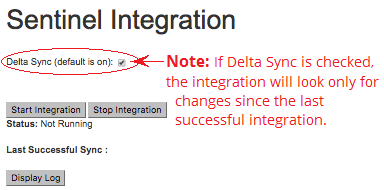
Once you have verified that all fields are populated correctly and that the form is properly saved, use the “Start Integration” button to begin the synching of Sentinel data to JIRA®. (For the first integration, be certain that the Enable Delta Sync option is unchecked.) The integration will run on the interval specified by the user via the form. (For additional information, please see Advanced Configurations - Set Sync Interval.
| Once the initial integration is complete, you can turn Delta Sync on. You will only need to disable Delta Sync if you need to run a full integration again. |
If necessary, you can use the “Stop Integration” button to stop your integration. Any vulns that have been added to JIRA® will be available to you in JIRA®, but no further vulns will be added unless and until you start a new integration process.
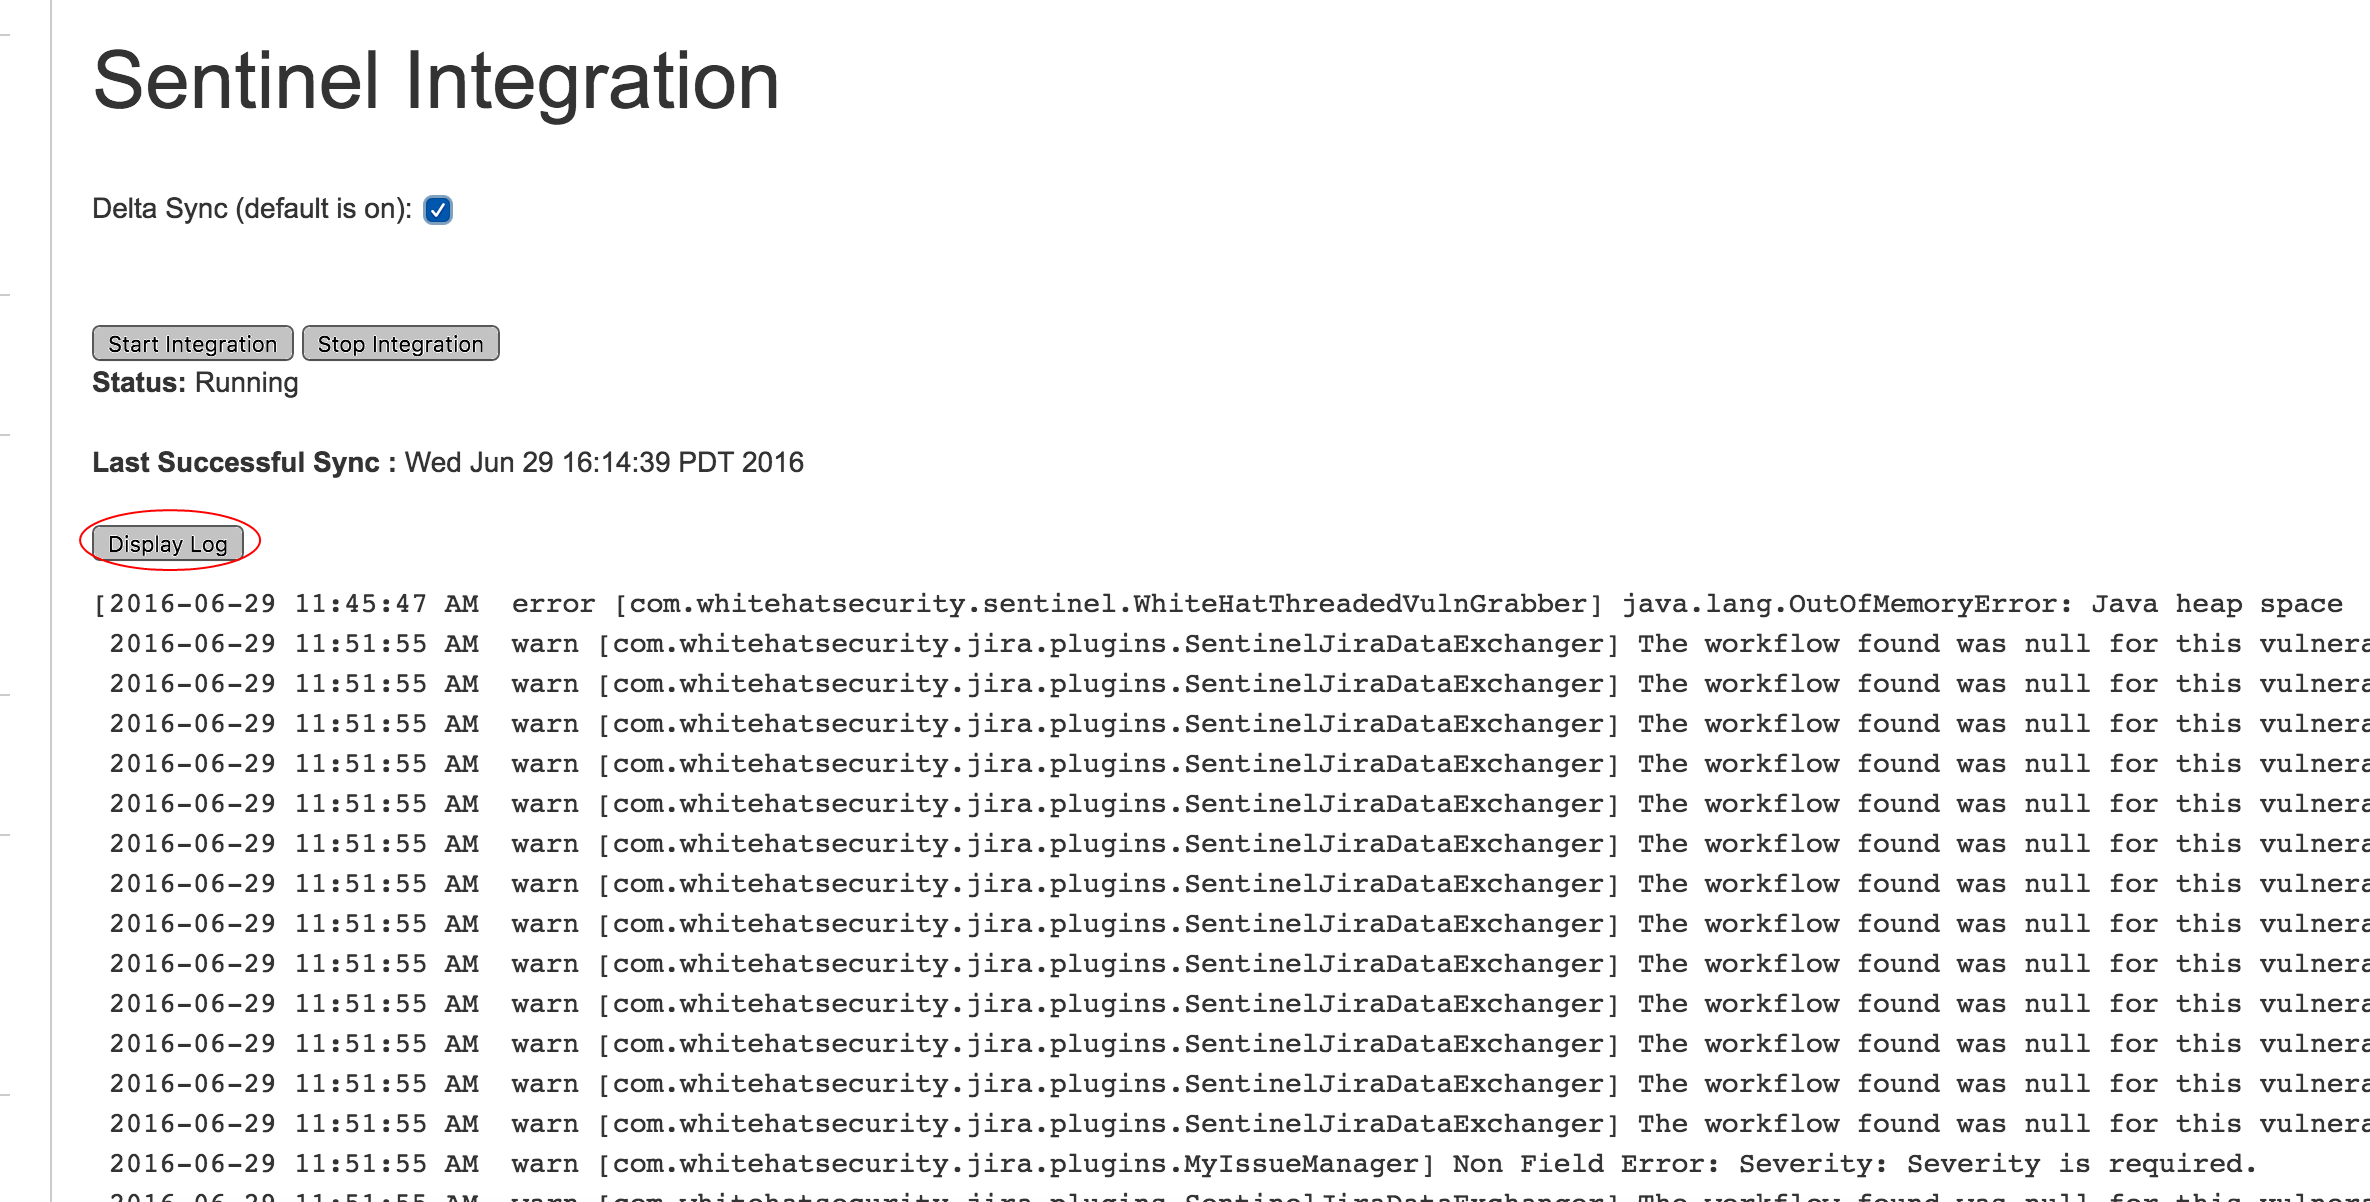
To view the log files, click the "Refresh Log" button. This page will be automatically refreshed once a minute. The most recent 1000 lines of the log will be displayed in a scrollable box, and the view will default to the most recent portion of the log.
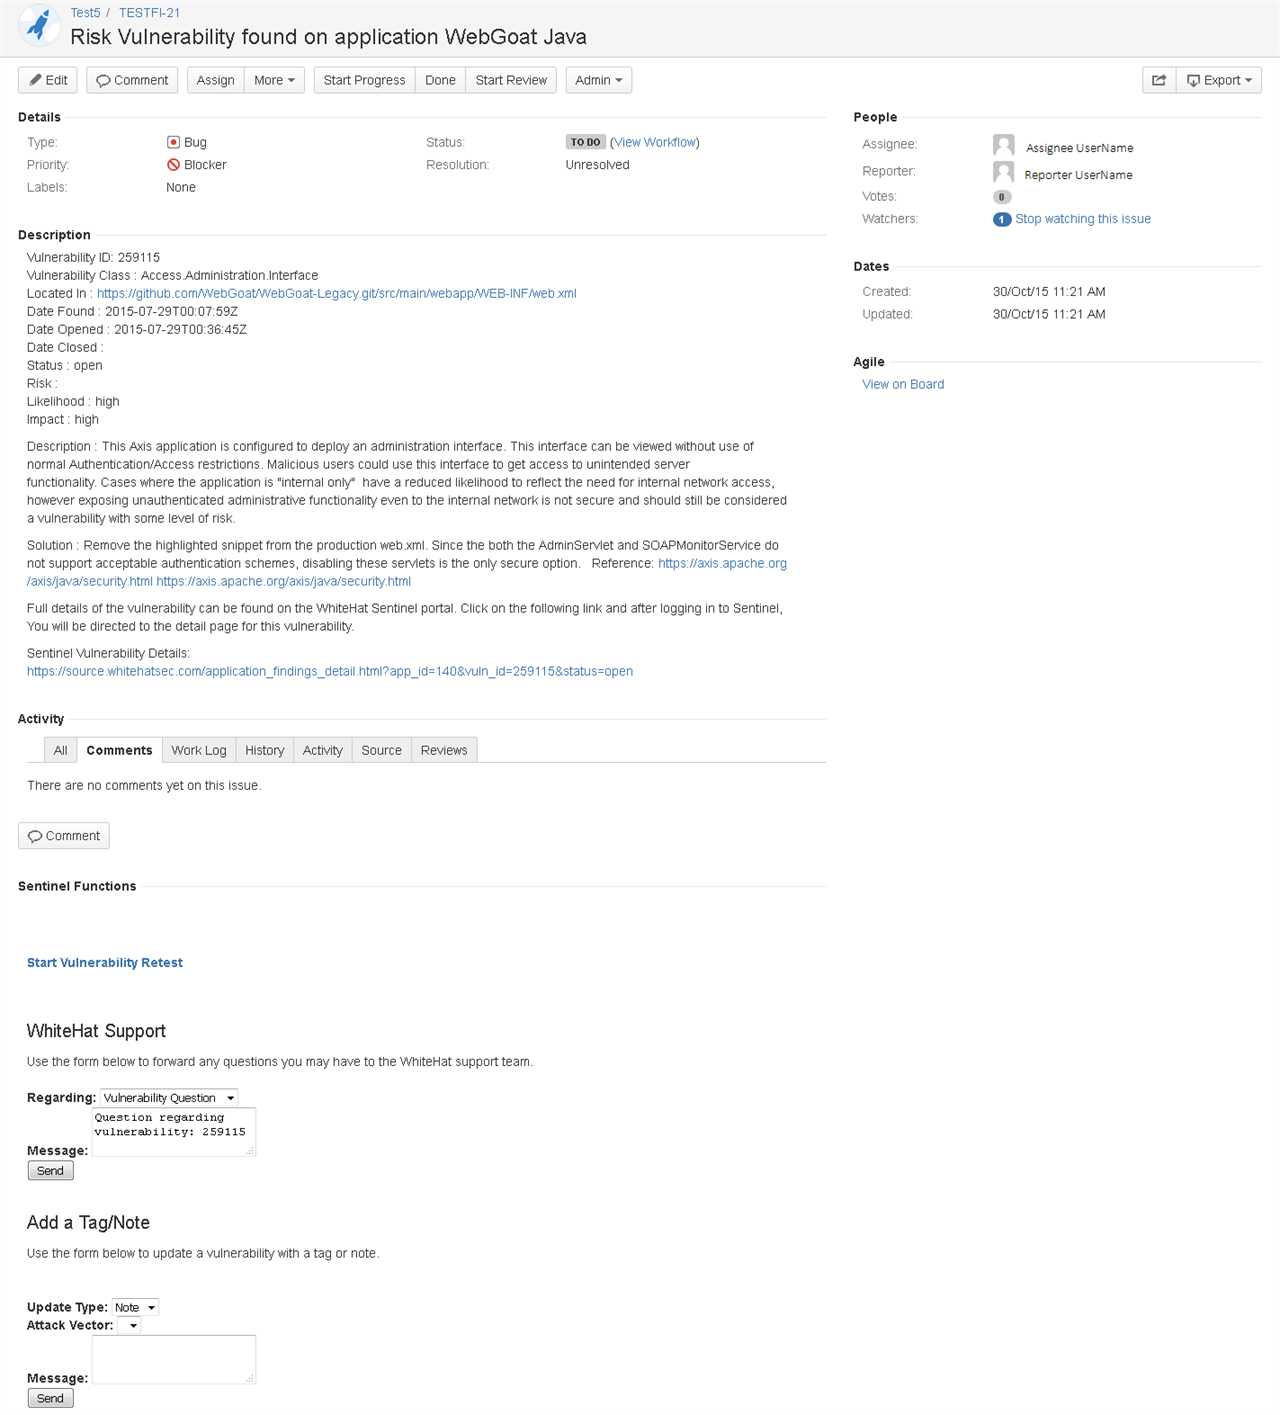
The Issues Page with the WhiteHat Sentinel Plugin for JIRA® Add-on
The Issues page of every vulnerability created by the plugin has now integrated key Sentinel features, allowing users to get the information they need to remediate vulnerabilities without leaving JIRA®.
Much of the data in the Portal’s Vulnerability Viewer is presented in the description section of the Issue. Toward the bottom of every Issue you will also see a section labeled "Sentinel Functions." This area provides users the ability to retest vulnerabilities from within the JIRA® UI, and to read the "Ask a Question" history and submit new questions directly from the JIRA® page. (Note that a user name and password will be required when asking a question, in order to ensure that the correct user is associated to the question. These fields are only required when submitting an issue; the information is not stored in JIRA® at any point.)
Troubleshooting the WhiteHat Sentinel Plugin for JIRA®
The most common issue is that after starting the integration no Issues are being generated.
In most cases this is due to the fact that the selected Assignee provided did not have the proper privileges to create that Issue. One simple way to verify this is to take that selected Assignee and try to create a dummy Issue manually from the JIRA® UI for that selected project. This typically will rule out the most common issue.
If that does not work, or if there are other issues, the plugin has been set up to generate verbose debugging. This can be seen by going into your JIRA® log folder and pulling that data from the atlassian-jira.log file. You also have full control over the verbosity of the logs based on your JIRA® log configurations.