Your Continuous Dynamic Portal Profile
| If you prefer to view/print in PDF format, click: Getting Started - The Basics, which includes Logging On, Continuous Dynamic Portal Supported Browsers, and Your Portal Profile. |
To view your profile, click My Profile at the top-right of the Continuous Dynamic Portal interface:

The My Profile page is displayed:

| Field Name | Description |
|---|---|
User Details |
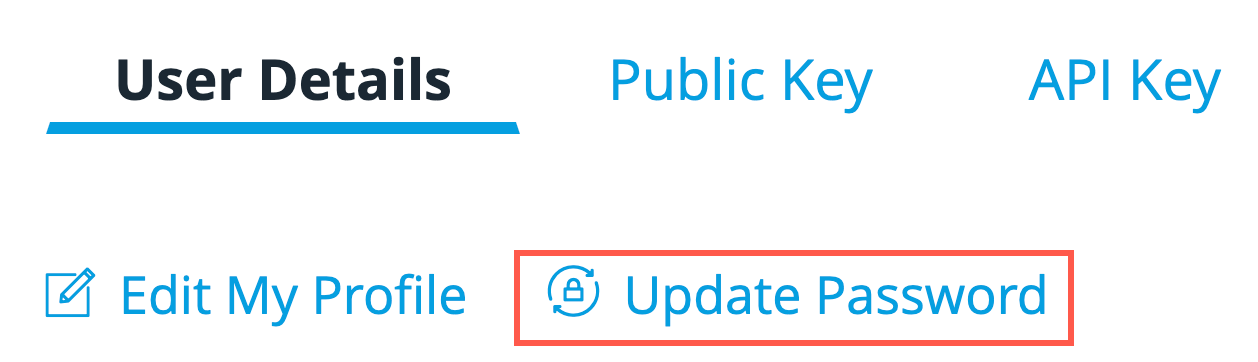
Here you can use Edit My Profile to edit information, such as name, title, email, etc. You can also use Update Password. |
Public Key |
Edit your Public Key encryption information |
API Key |
View, create or regenerate your web API Key information |
My Profile
To edit information in your profile, select User Details > Edit My Profile.

The My Profile editing screen is displayed.
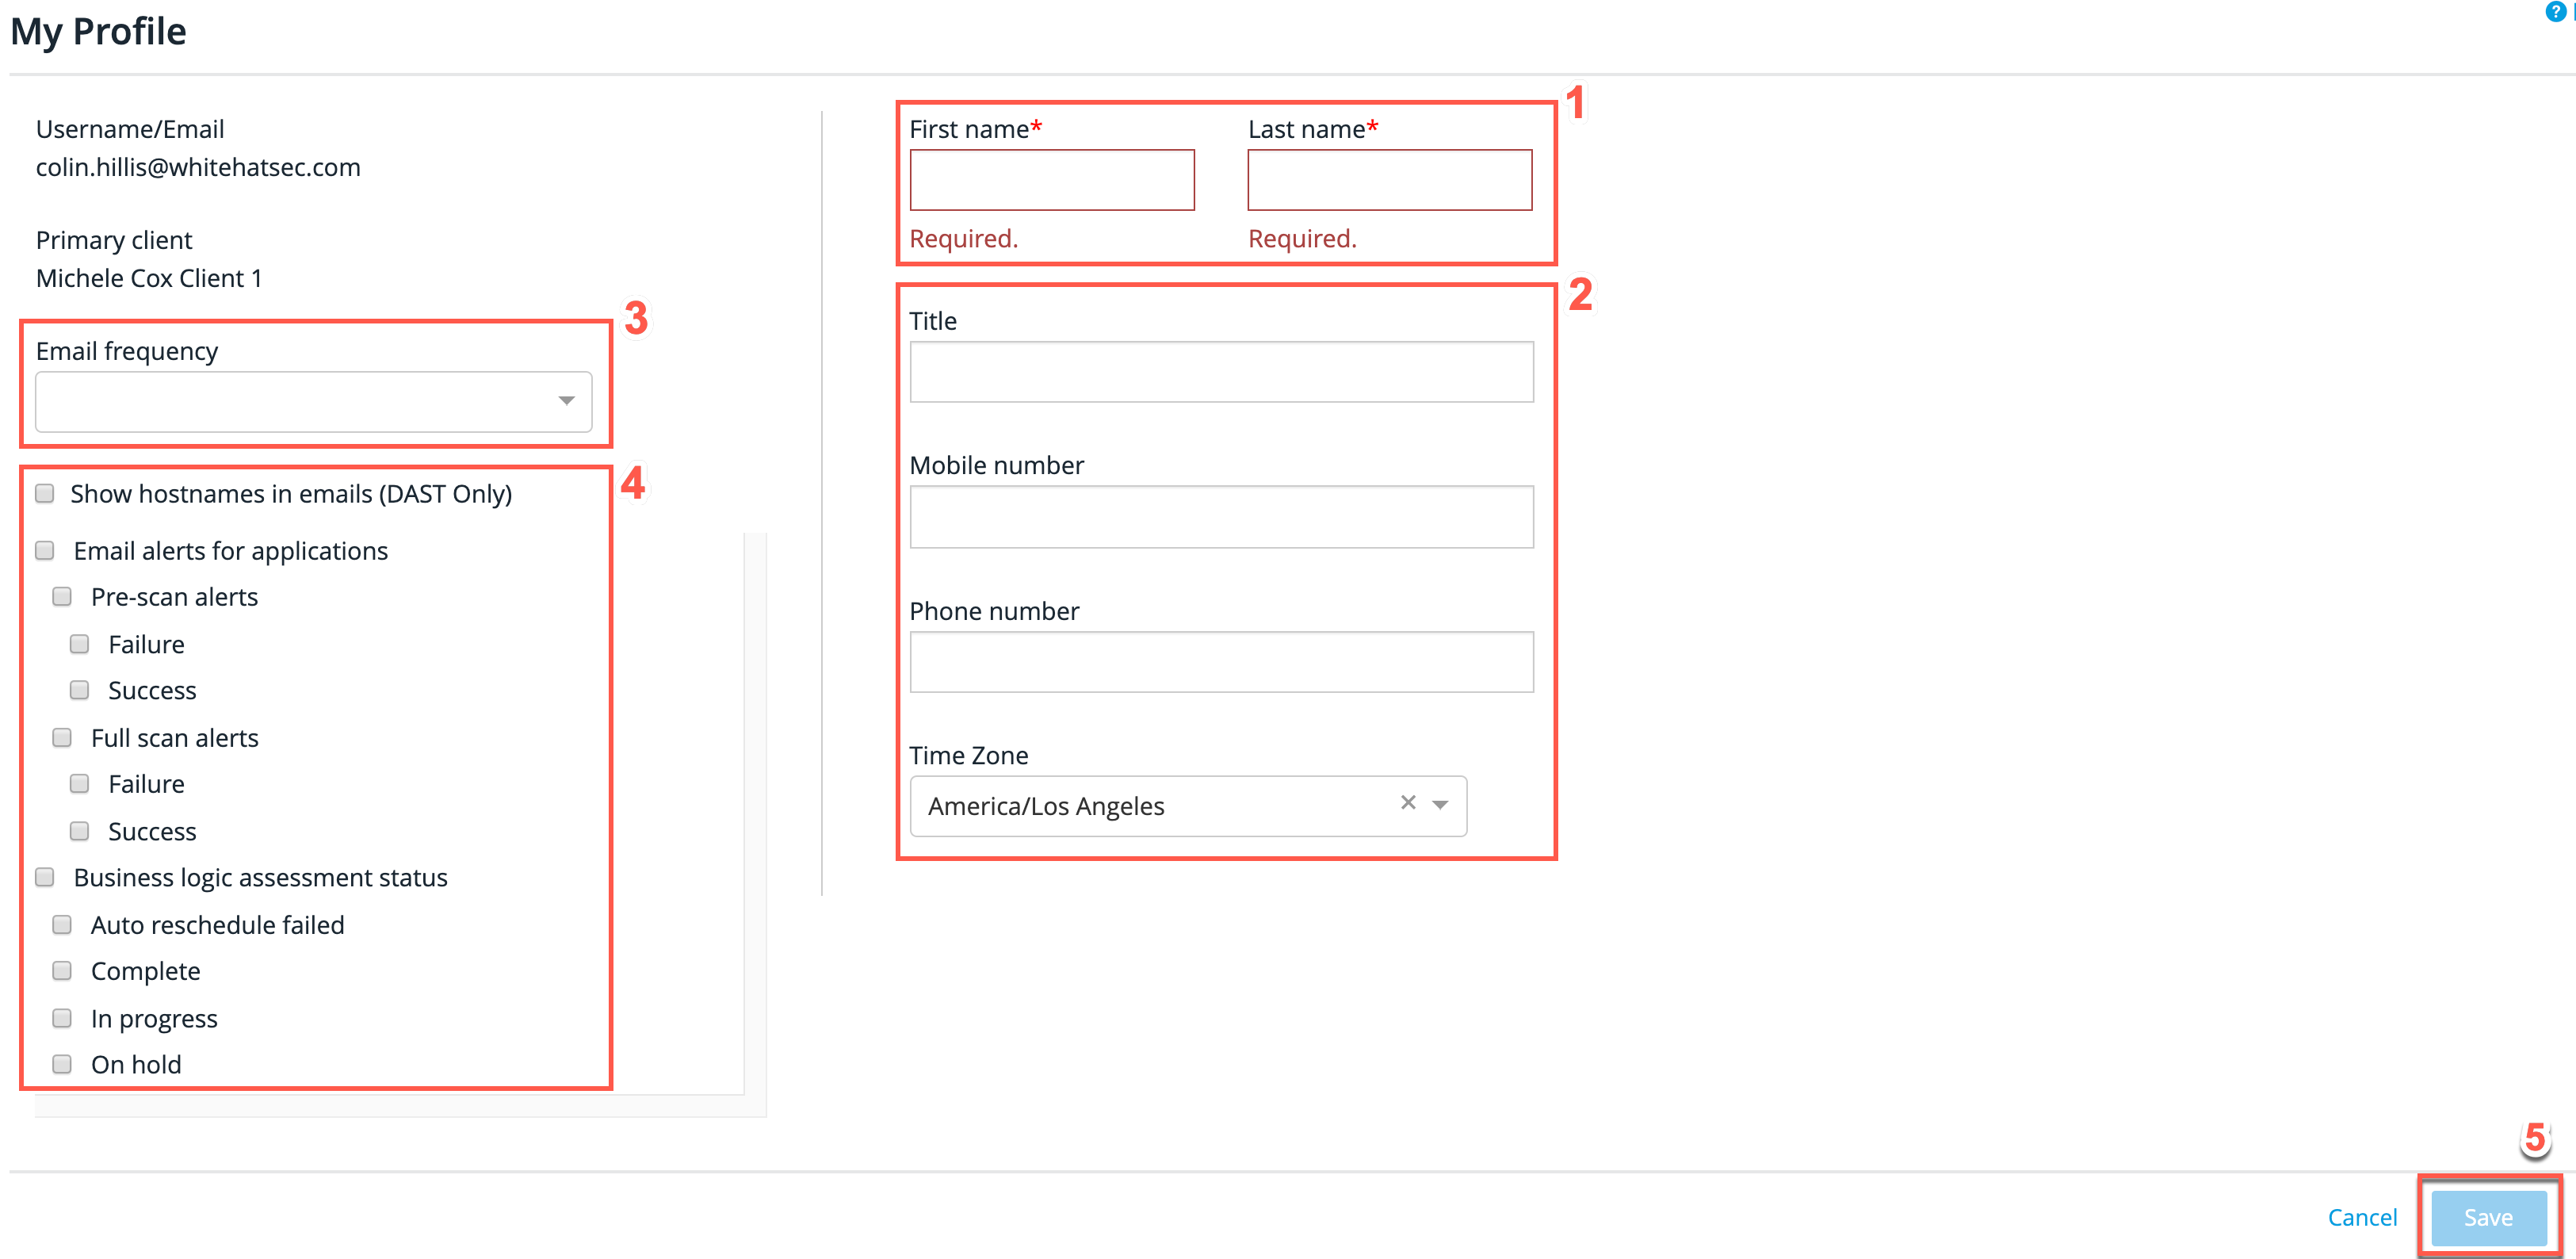
View or make changes to your profile, as follows:
-
The First name and Last name fields must be populated.
-
Enter your Title (e.g. IT Security Manager), Mobile number, and Phone number. Then select your appropriate timezone from the Time Zone drop-down menu.
-
From the Email frequency drop-down, select one of the following:
-
Daily
-
Weekly
-
Monthly
If you require more granular email frequency, please contact support@whitehatsec.com.
-
-
(Optional) Select whether to Show hostnames in emails (DAST Only), if this option is available. This only applies to DAST-related emails.
-
Select the email alerts you want to receive for the status of business logic assessments.
-
Click Save.
Changing Your Password
Password guidelines are determined by your Portal Administrator. Your organization may have adopted single sign-on or multi-factor authentication. If you are using single sign-on, you will not need to enter your Portal password; instead simply log on via your SSO. If you are not using single sign-on and you need to change your password, click User Details > Update Password.
The Update Password editing window is displayed.
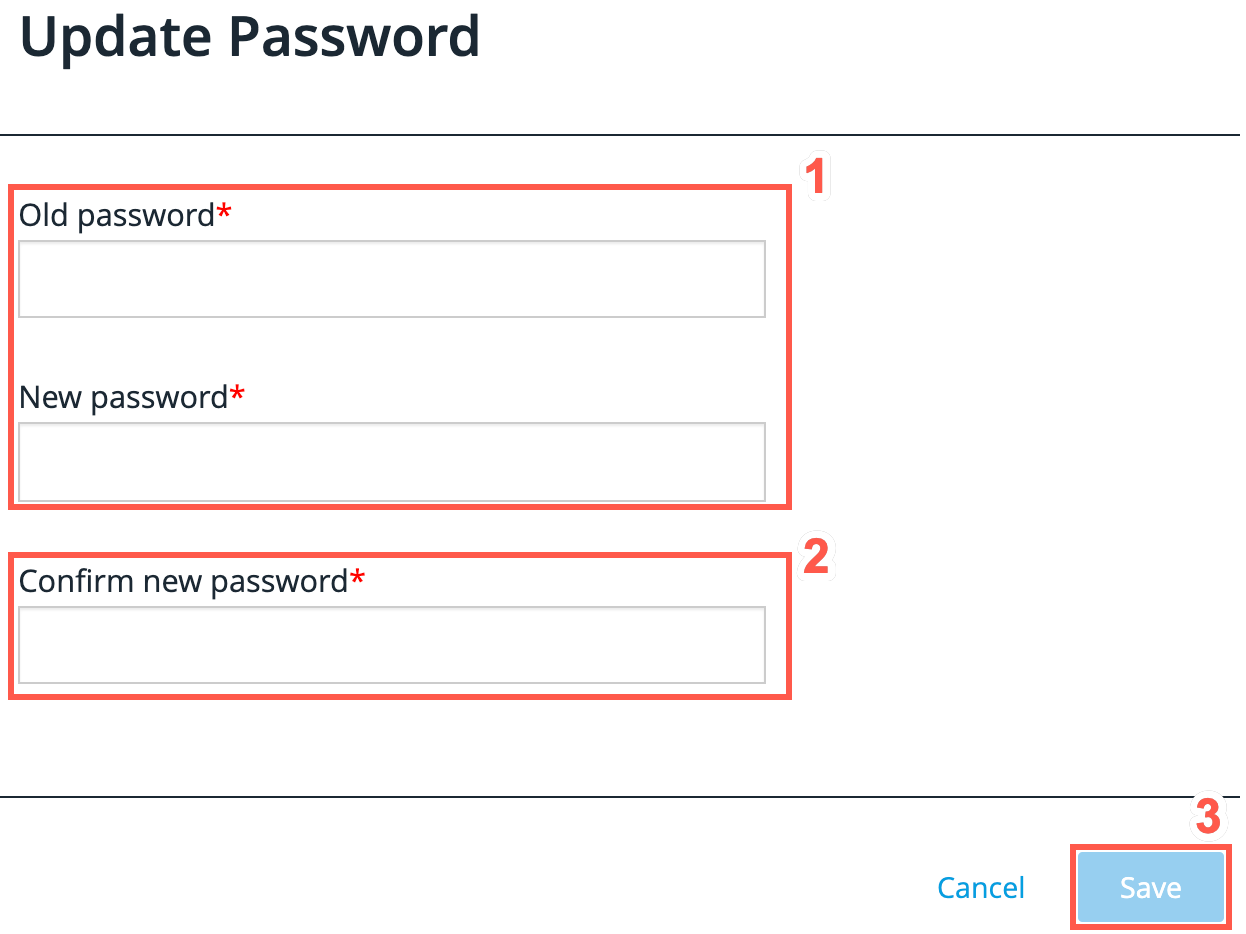
-
Type your Old password.
-
Type your New password and repeat it in the Confirm new password field. Both entries must match to proceed.
-
Click Save.
Password Format and Guidance
By default, the Portal will require that your password contain at least six characters, including at least one number and at least one letter. Additionally, password restrictions may be in place, which enforces that your password adopts some or all of the following:
-
Uppercase letters
-
Lowercase letters
-
Numerals
-
Special characters
-
Excludes all/part of username
-
Excludes all/part of email
Always protect your password. If someone else obtains your password, they may gain access to your vulnerability information. Black Duck Support will never ask for your password.
Public Key
If your server uses Pretty Good Privacy (PGP), you can use your public key to send secure data across potentially insecure networks. You can enter or delete your public key here. If you have questions about PGP, see your network administrator.
-
Click Public Key to display the Public Key editing page.
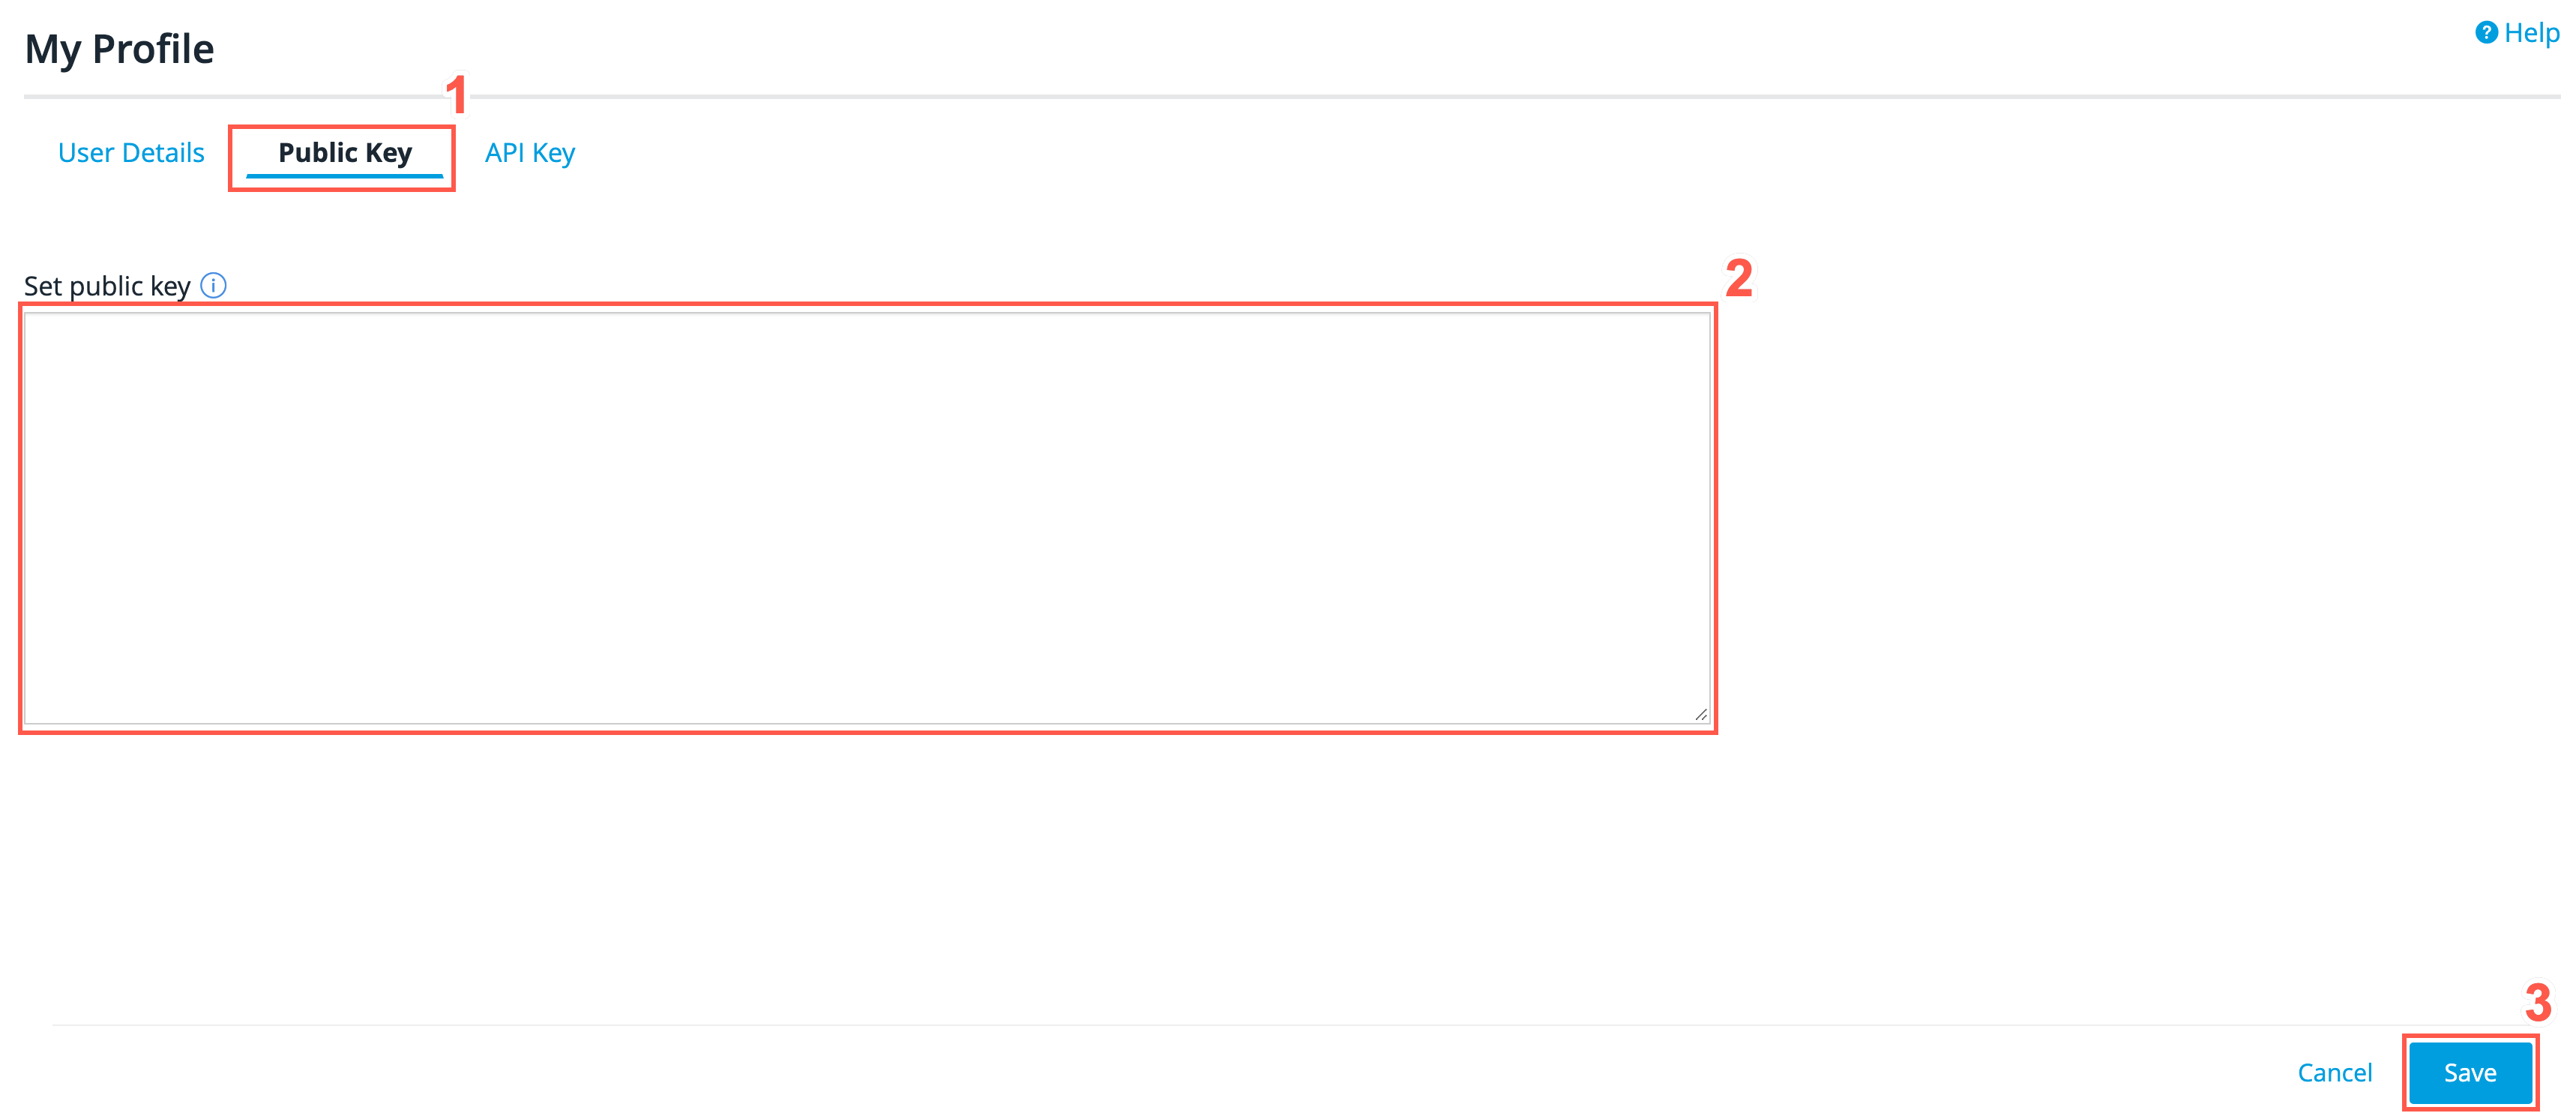
-
Type your key into the free text field.
-
Click Save, or Cancel to cancel the operation.
API Key
Each user account may generate a unique 32-character Web API Key, which is used to authenticate your API requests. The Web API key is intended for use inside the applications that are accessing the API. It is not intended for accessing the API through your browser.
If You Have a Portal Password:
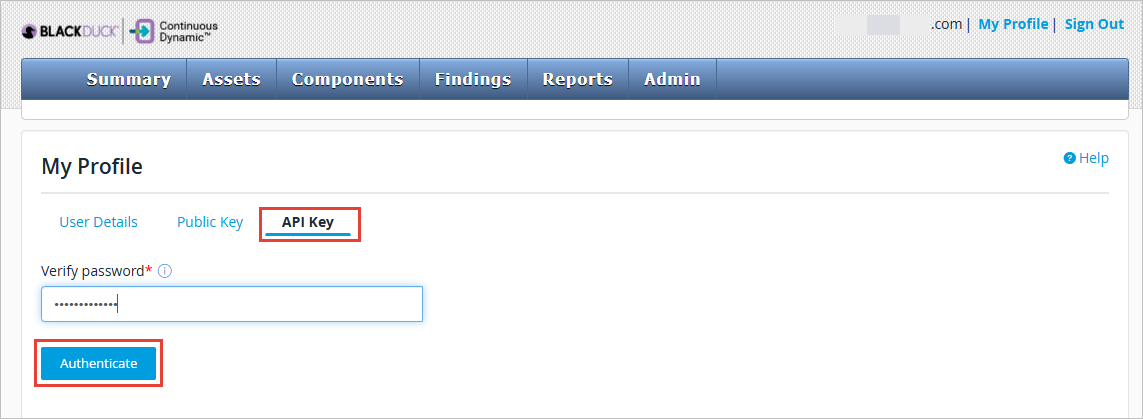
To view the API key, or to create a new one:
-
Click API Key.
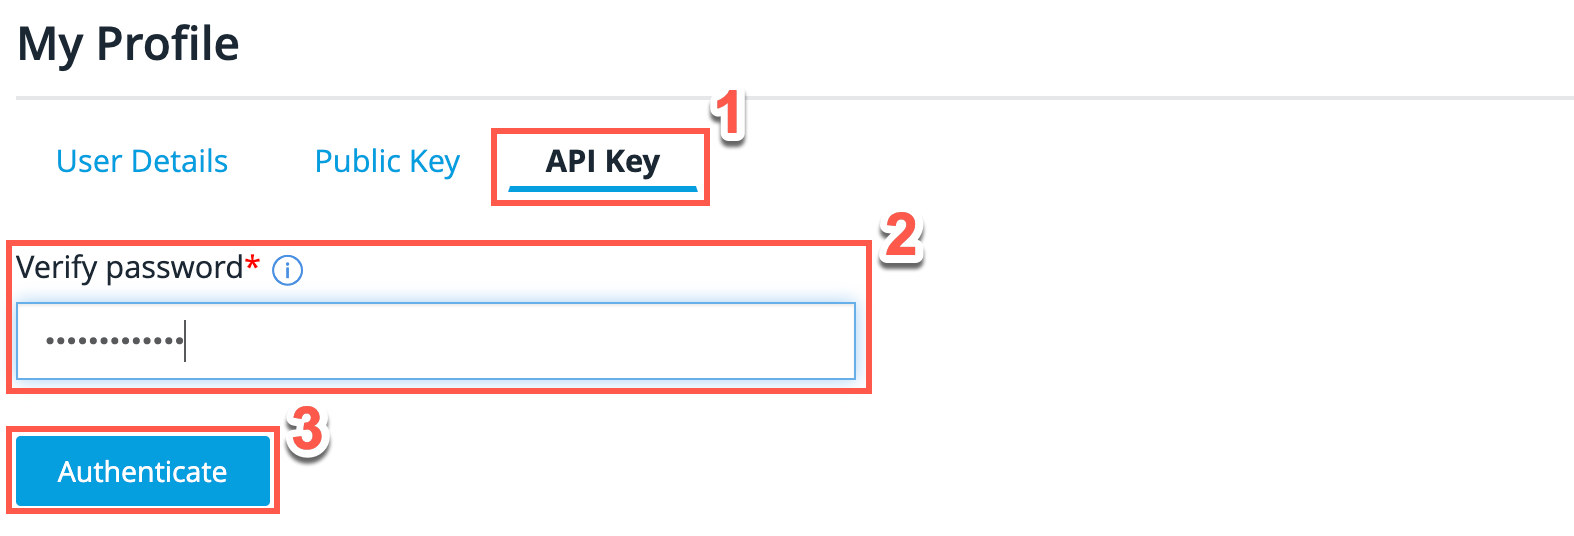
-
When prompted for your Portal password, type your password into the text field.
-
Click Authenticate
Your key will now be displayed. If you have never requested your API key before, a key will be generated for you.
If You Access the Portal Using Single Sign-On (SSO)
To view the API key, or to create a new one:
-
Click API Key.

-
Your account requires additional authentication. Choose either Request Code by SMS or Request Code by Call. Your authentication code will be provided via the option selected.
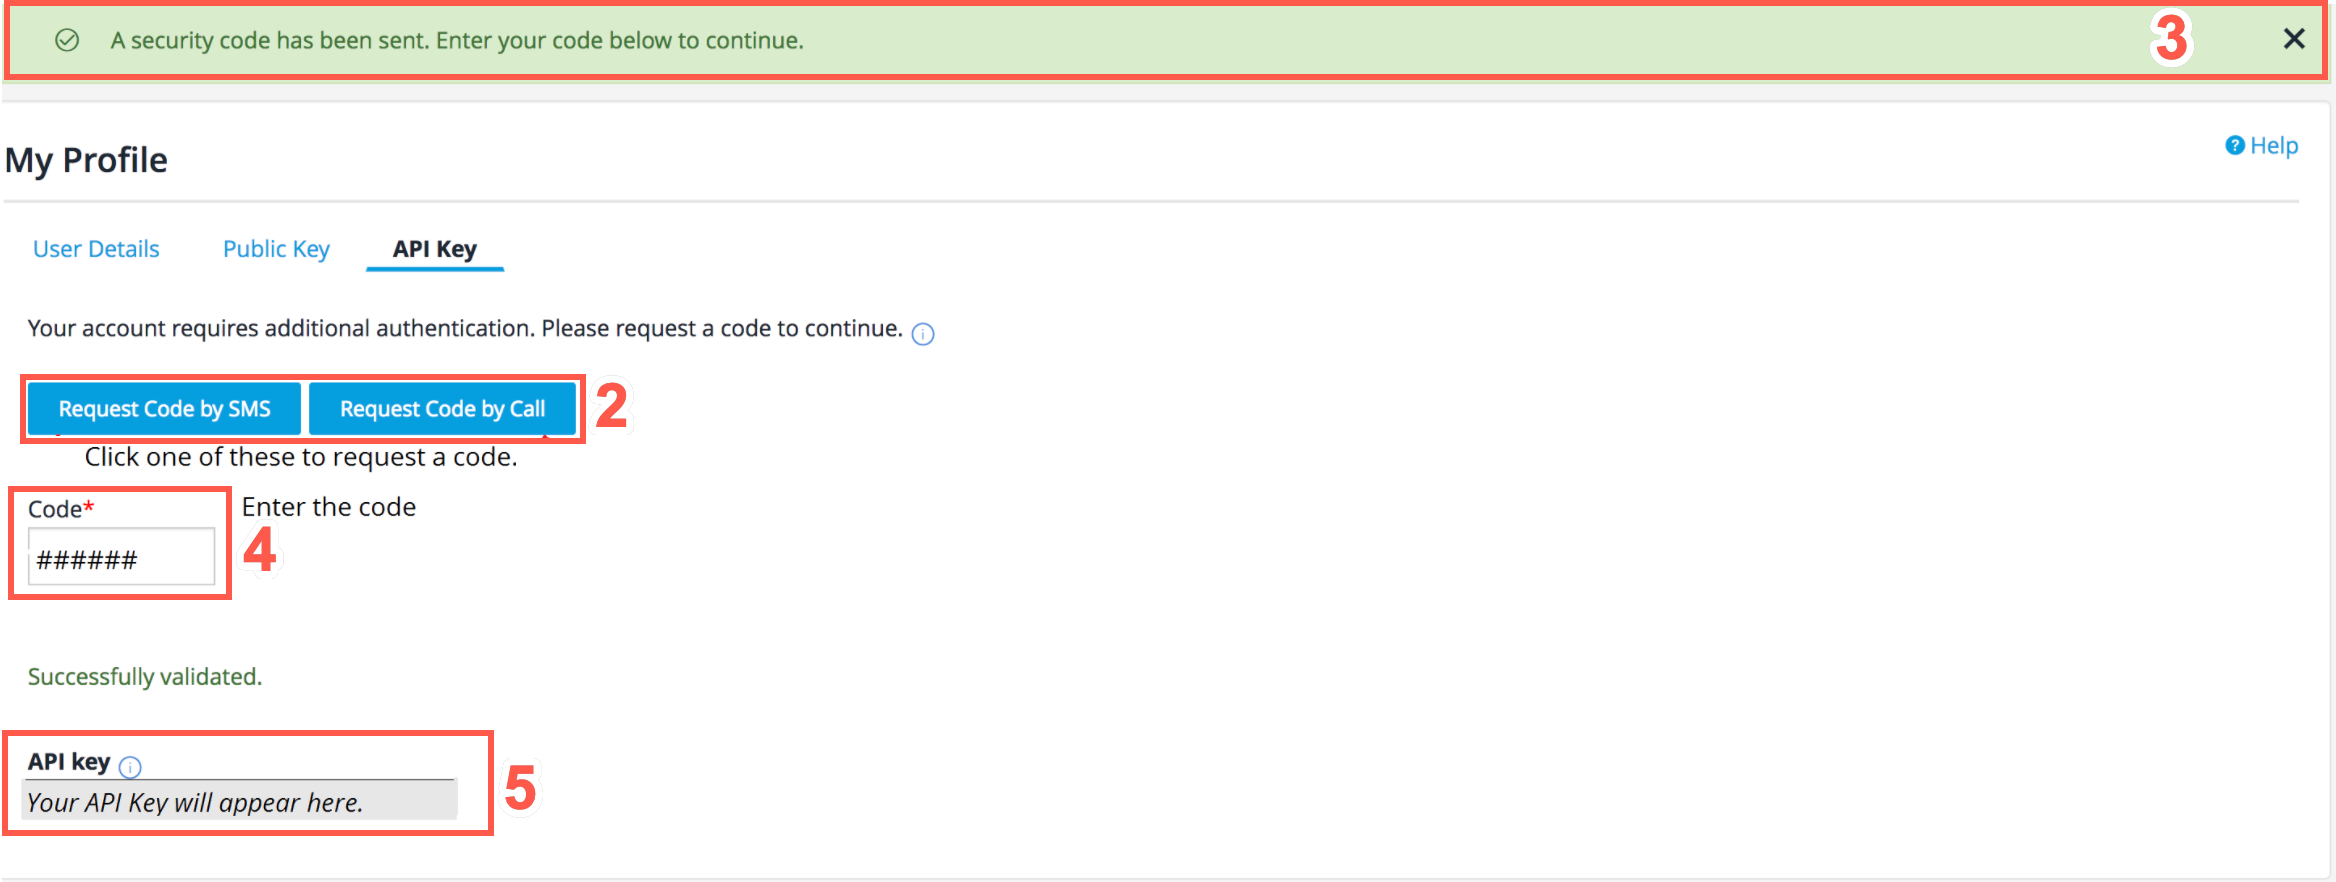
-
Ensure that the confirmation banner is displayed at the top of the screen, which confirms if the code has been sent.
-
Once the code is received, type it into the Code field.
-
Ensure that your key is displayed in the API key field. If you have never requested your API key before, a key will be generated for you.
| Protect your web key. Your key is the equivalent of a user name and password that gives access to all your vulnerability data. Treat it as carefully as any other password. Black Duck strongly recommends that you never use your Web API Key in your browser. It is only intended for use when accessing the API programmatically. If you do use it directly in a URL, it is logged to your browser history. Therefore, if you must use your Web API Key in your browser, you are strongly encouraged to clear your browser history/cache automatically every time you log out of the Portal. Otherwise, your key will be visible to anyone who gets physical or electronic access to your browser history. |
| For information about configuring SSO for the Continuous Dynamic Portal, see Single Sign-On for Black Duck Continuous Dynamic. |
Regenerating Your API Key
From time to time, it may be necessary to regenerate your existing API key.
To regenerate your API key, perform the following steps:
-
Enter your password in the text field.
-
Click Authenticate.
-
Click Regenerate API Key.
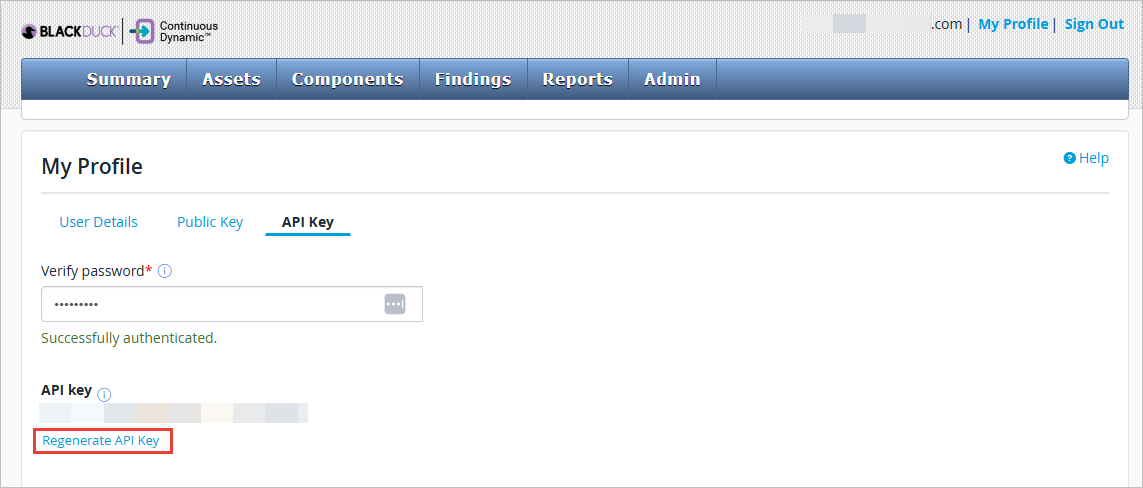
-
Click Confirm.
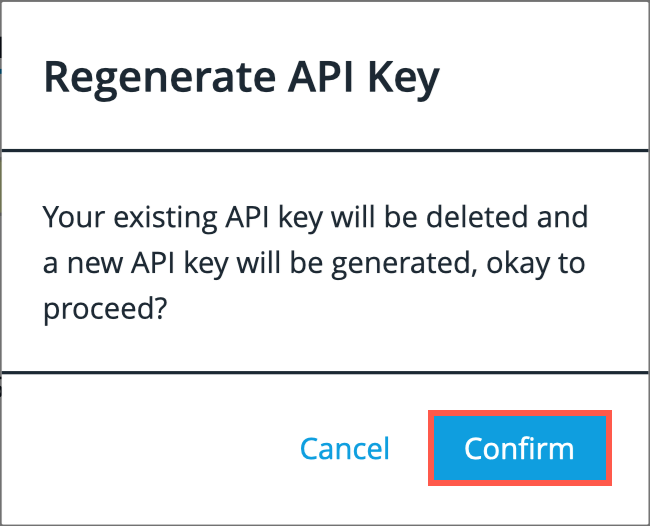
-
A confirmation banner is displayed at the top of the screen, which confirms the API Key has been regenerated.
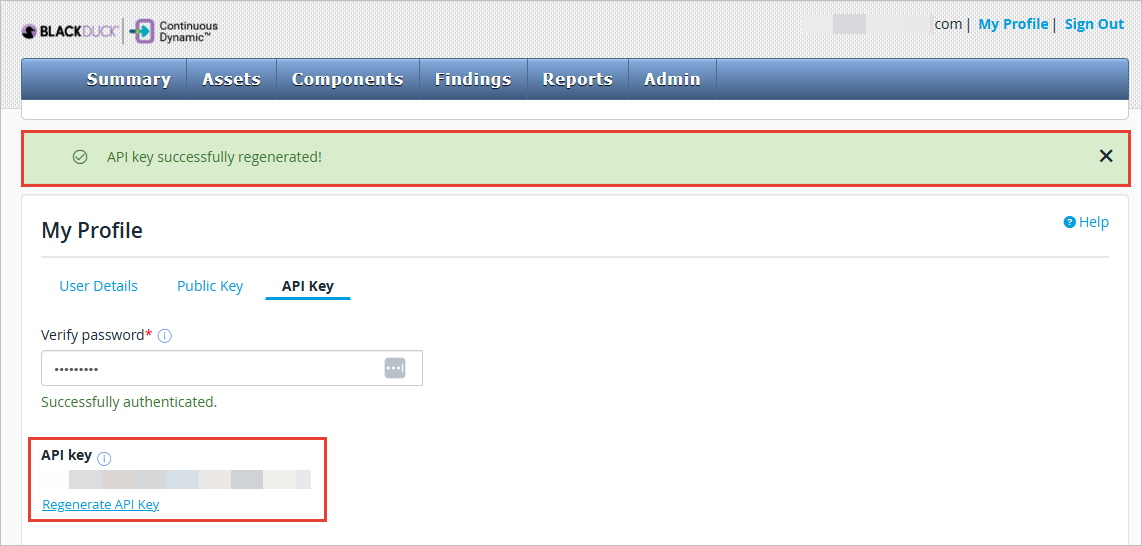
-
The regenerated API Key is displayed in the API key field.
Regenerating Your API Key Using Single Sign-On (SSO)
If you access the Portal using Single Sign-On (SSO), perform the following steps to regenerate your API Key:
-
On the My Profile page, select API Key.
-
View your existing API key:
-
Click Request Code by SMS or Request Code by Call to request an authentication code. A confirmation banner confirms that the code was sent.
-
Enter your code in the Code field and then click Submit. If the code was accepted, your existing API key is displayed at the bottom of the page under API key:
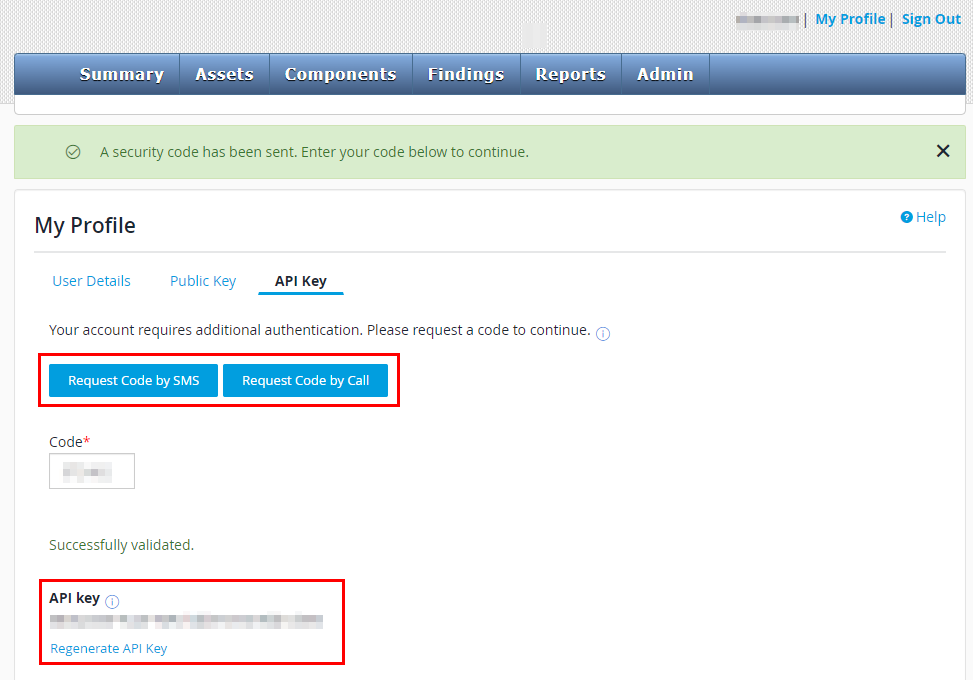
-
-
Regenerate your API key:
-
First, you must request another authentication code by SMS or phone.
-
Enter your new code in the Code field (replacing the previous code) and then click Submit.
-
Click Regenerate API Key.
-
In the confirmation dialog, click Confirm to proceed.

A confirmation banner confirms that the API key was successfully regenerated. The new API key is displayed under API key:
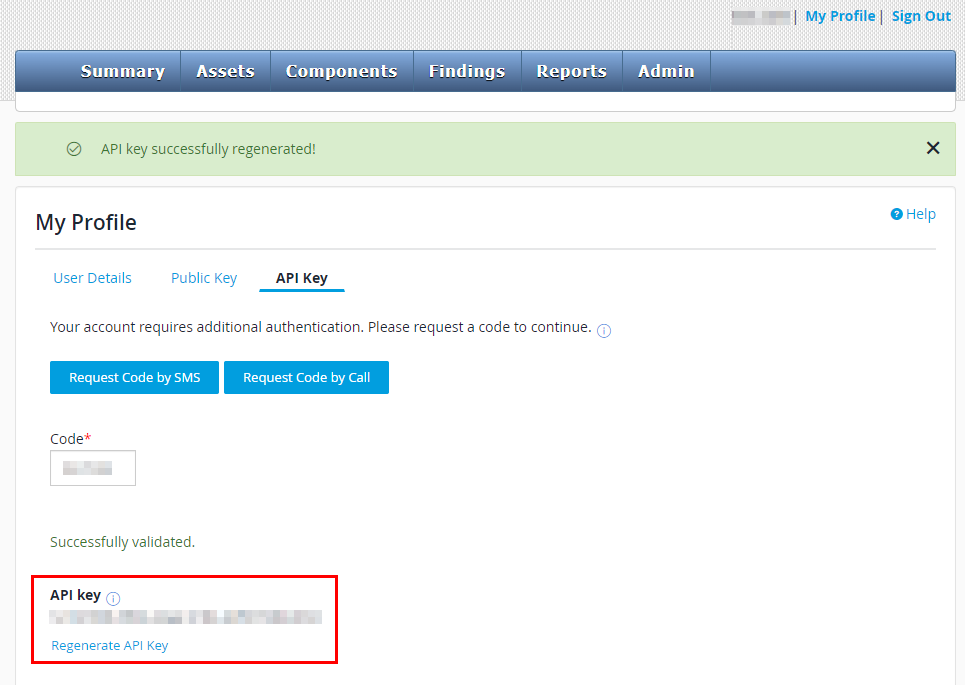
-