Adding an Application
To add a new application under Sentinel Source (for static application security testing):
-
Select the Assets tab
-
Click Add Application.
The Add Application Wizard will walk you through adding the Asset Details, adding the Codebase, and configuring the scan and scan schedule.
Adding Asset Details
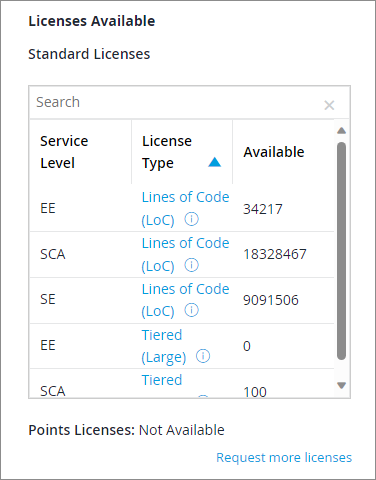
On this screen you will see the available licenses. (Multi-client customers will see the licenses available to the primary client.) If you do not have one or more license types, you may click Request more licenses to request additional licenses from Customer Service.
Add asset information for your new Application:
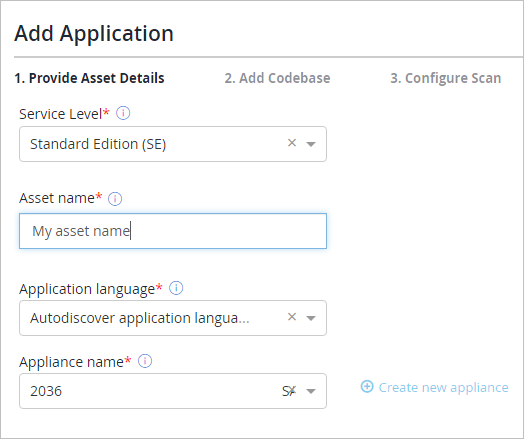
Enter the application name, select a language (or the auto-discover option), and select an appliance. If you do not have an available appliance, click on Create new appliance. As a rule, if your current appliance is handling more than ten (10) applications or five (5) million lines of code, we recommend adding an additional appliance. (See Managing Your Sentinel Appliance for more information.) If your appliance is currently disconnected, it will be grayed out; you can still select that appliance, but pre-scan and related options will be disabled.
If you are uncertain of the language, you can select "Autodiscover application language" in the drop-down and Sentinel will attempt to determine the language being used when the assessment begins. Because this will automatically scan for all supported languages, it is possible that this choice will result in a longer duration for the initial scan, and if we find multiple languages, all supported languages will be scanned. This may result in the use of additional licenses.
(For specific information on our support for Javascript, please see Javascript Support.)
Click on "Next" at the bottom right of the screen.
Adding a Codebase
The next step in the Add Application Wizard is selecting a codebase by entering the codebase name, a URI type and path, and an authentication type and source code management system (if appropriate).
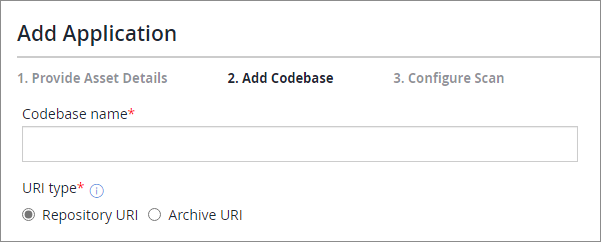
URI Type
The URI type may be a repository or a source code archive; you will have an opportunity to enter any necessary credentials for your URI based on type.
The URI Type may be a Repository URI,or a Source code archive URI, or a Binary Archive URI. For more information on the Repository or Source code archive URI, please see Adding a Code Base. For more information on using a Binary Archive URI, please see Binary Analysis.
-
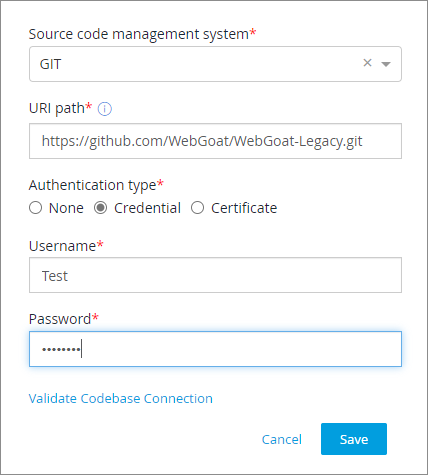
For a repository, you will need to enter the URI, the source code management system, and any credentials required:
-
For a source code archive, you will need to enter the URI path and any required credentials:
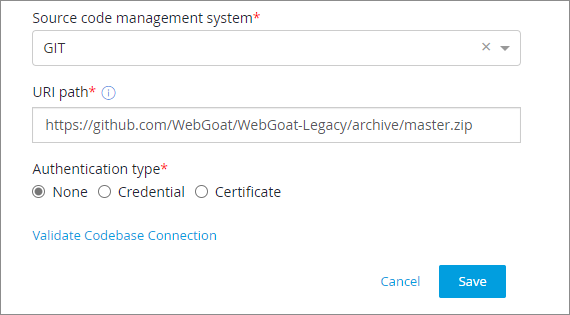
Once you have added at least one codebase for the application, you can click on Validate Repository Connection to ensure that the connection is working correctly; you can also click on "Add New Codebase" to add an additional code base for this application. (Note that if you need to add more than twenty (20) code bases for an application, you will need to contact Customer Service at support@whitehatsec.com.)
When you have added your codebases, click on Add to see the codebases you’ve added, with their repository types, URI paths, and connection status. Click on Validate now if necessary to validate your connection. Once the connection is validated, you can click on Create and PreScan Now to create your application and perform a preliminary scan; or you can click on Next to configure your scan and scan schedule.
The preliminary scan will help you identify any missing dependencies or file coverage issues, and confirm the license type that will be used for the application. Performing your scan configuration before the pre-scan will allow you to upload a configuration file or exclude specific directories or files from scanning.
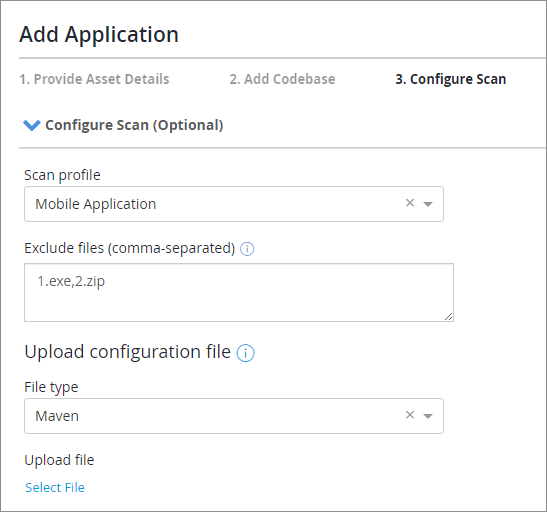
Scan Configuration
The Scan Profile allows you to select a specific scan profile type from a drop-down list, and to exclude specific files in a comma-separated list. You can also upload a configuration file (choose an option and click on Select file).
Schedule Configuration
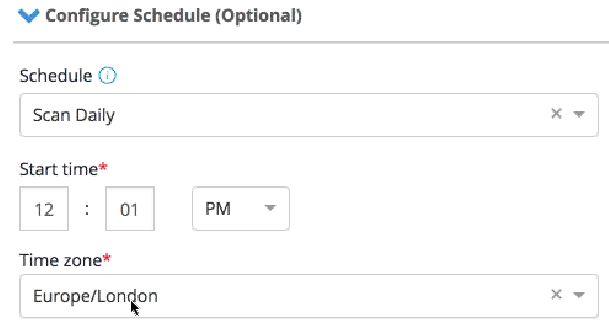
The Configure Schedule section allows you to choose to scan continuously or during specific named periods - none, daily, or weekly - at a determined start time (and day, if relevant). Please be certain that the time zone is set correctly.
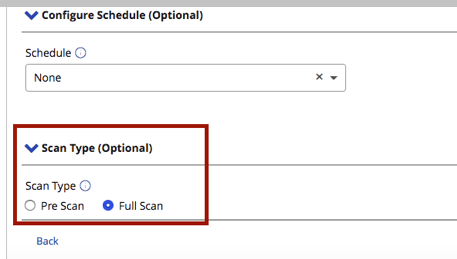
You can also select a Scan Type (pre-scan or full scan) during on-boarding. The default for this selection is set at the account level under Account Overview, but if you want to override that setting for this specific application you can do so here. (For information on setting a default scan type, please see The Account Overview Tab: Setting Your Default Application Scan Type.)
If you run a pre-scan for the new application, then once the scan succeeds you can decide whether or not to initiate a full scan and consume a license.
If you run a Full Scan for the new application, an initial pre-scan will be run and if it succeeds will immediately kick off a full scan, consuming an appropriate license. If the pre-scan does not succeed, the application will be shown as pre-scan; if you need help resolving the issue that caused the pre-scan to fail, please contact Black Duck. If no license of an appropriate type is available, the application will show as Rejected; you will need to request additional licenses to add this application.
| Requesting a full scan will consume the appropriate license. |
Once this is complete, please click on Create and PreScan Now.
You will see the Asset Management Page with your new asset and an Asset created successfully banner. To view the asset details, click on the asset name. You will see the Asset Overview page, and from this page, you may:
-
Add a Code Base (or edit or delete an existing code base)[1]
-
Run a preliminary scan ("Pre-scan") of the application to determine the application size)
-
View Findings
-
View or Edit the Scan Configuration
-
View Libraries
-
View File Coverage
-
Edit Application Information, including the application name, your custom asset ID, the asset owner, or the asset phase
-
Edit the Application Language (click on the pencil icon next to the language)
-
Edit the Satellite used for this application (click on the pencil icon next to the Satellite Name)
-
Edit the Application Policy (click on the pencil icon next to the Application Policy header)