Account Overview - Applications Tab
| The Account Overview tab is only available to users with Admin permissions associated with their account. |
In the Account Overview menu, click the Applications tab. From this page, you can review the following items and take associated action:
-
Licenses Overview - Review licenses purchased, consumed and available by license or service type.
-
Assets Overview - Review assets by language, lines of code, file size, asset size, date added or date last scanned.
-
Configure Account - Review and configure default scan type, binary analysis, and directed remediation.
Licenses Overview
The first section on the Applications tab provides a summary of license usage and availability.
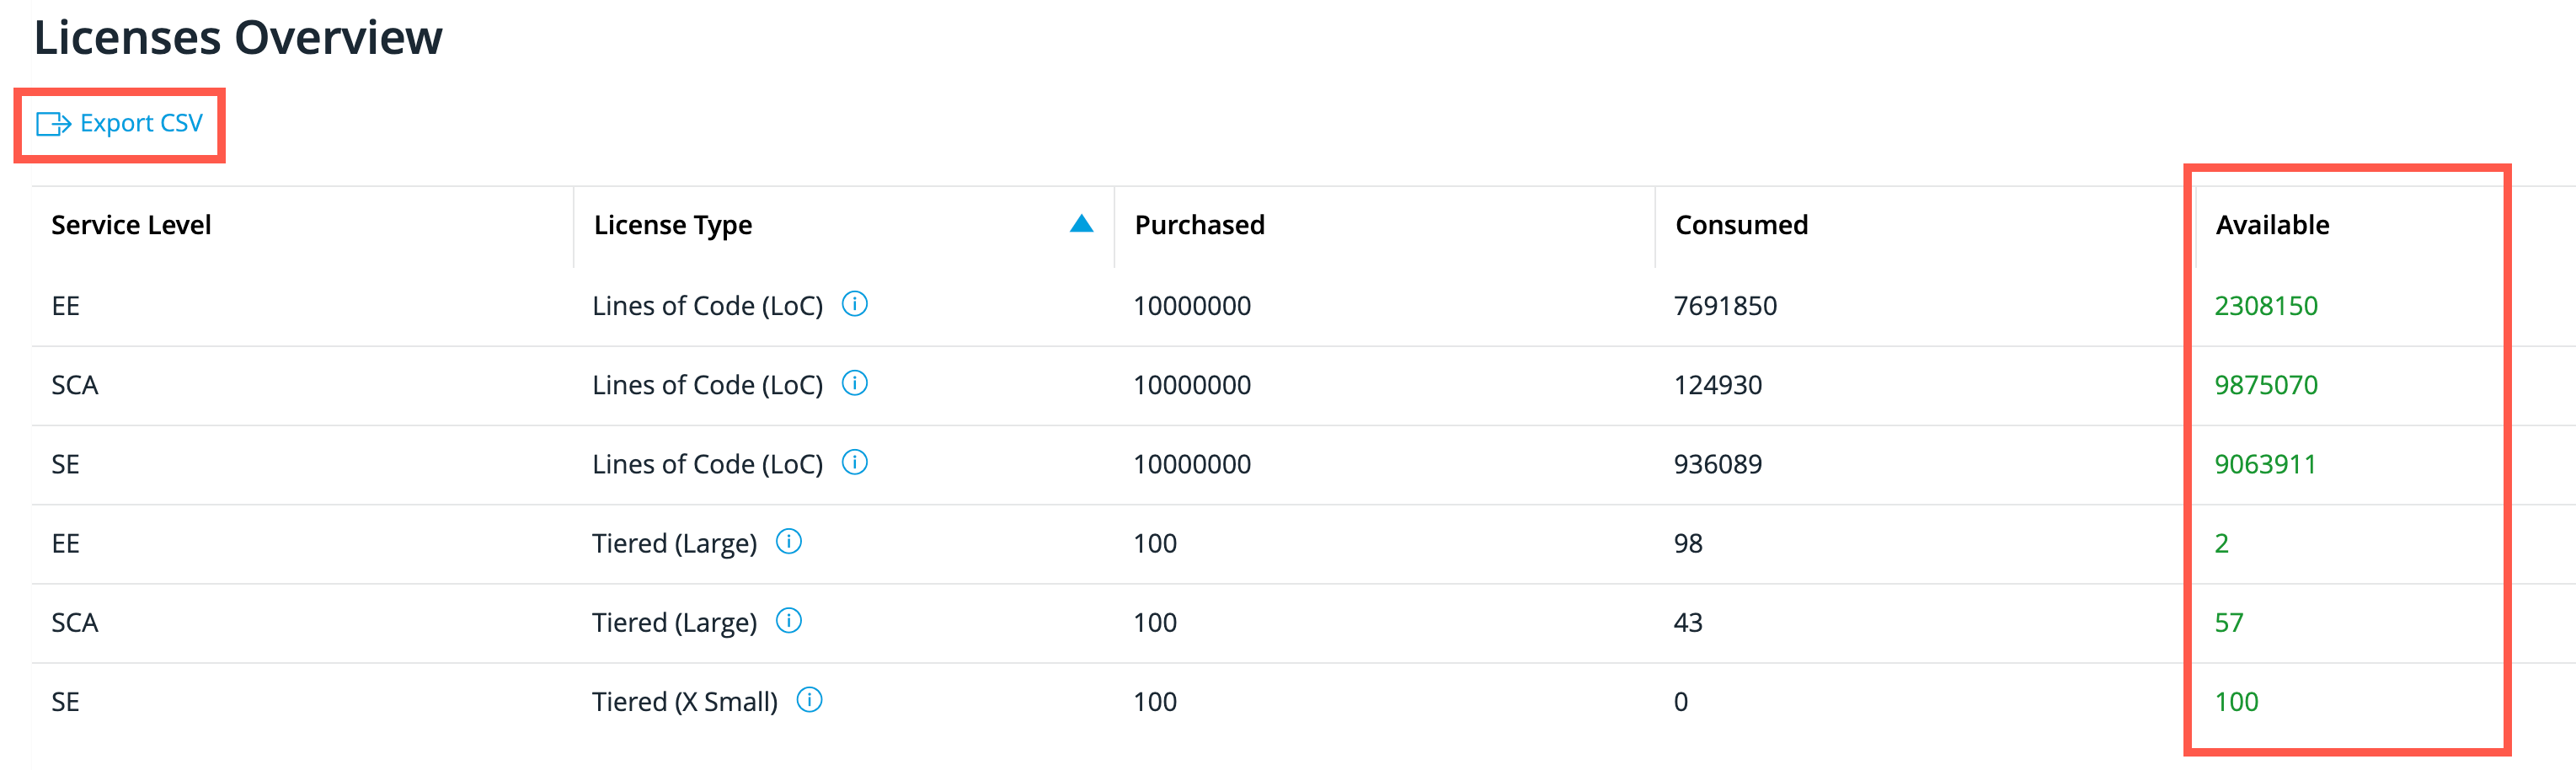
The table displays purchased licenses, consumed licenses, and licenses that are still available for use. You can sort the table by clicking any of the column headings. This sorts the table contents according to that column’s alphabetical order or lowest to highest value. Click the column title again to reverse the order. You can export the entire table by clicking Export CSV.
| In certain situations, you may temporarily see a negative value in the Available column. Please contact Customer Support at support@whitehatsec.com to resolve this issue. |
Assets Overview
The second section on the Applications tab provides a summary of your assets.
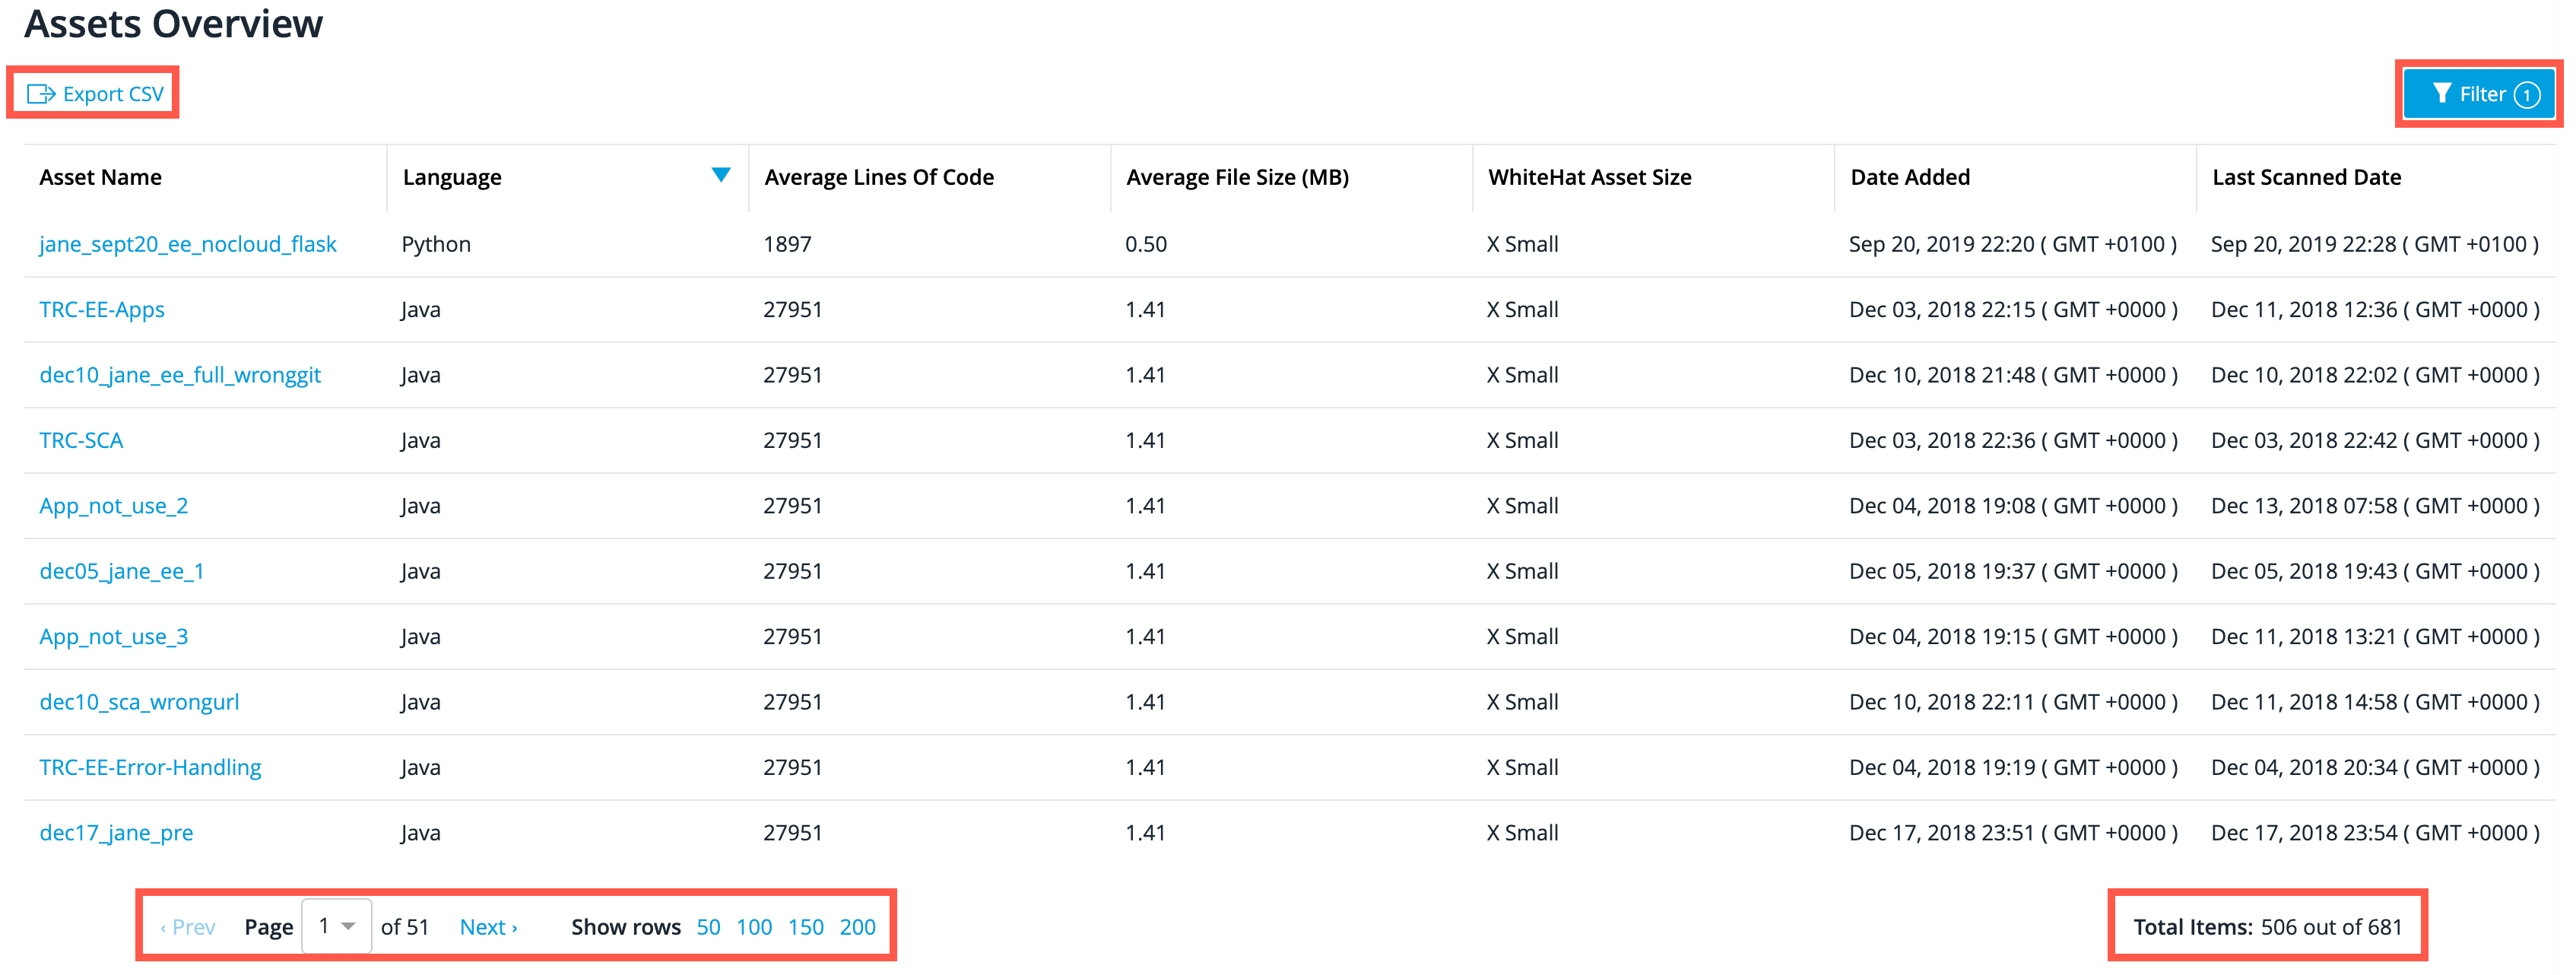
The table displays all assets, the language used, the average lines of code, average file size, the asset size, the date added and the last scanned date. You can sort the table by clicking any of the column headings. This sorts the table contents according to that column’s alphabetical order, or the lowest to highest value. Click the column title again to reverse the order.
The information provided in this table enables a user to calculate how many lines of code are in each asset and therefore establish if they have enough licenses available to perform required scans.
Click the Filter button to apply a filter or filters to the list. The total number of assets displayed is presented at the bottom-right side of the table and the table page navigation is displayed at the bottom left side of the table. Lastly, you can export the entire table by clicking Export CSV.
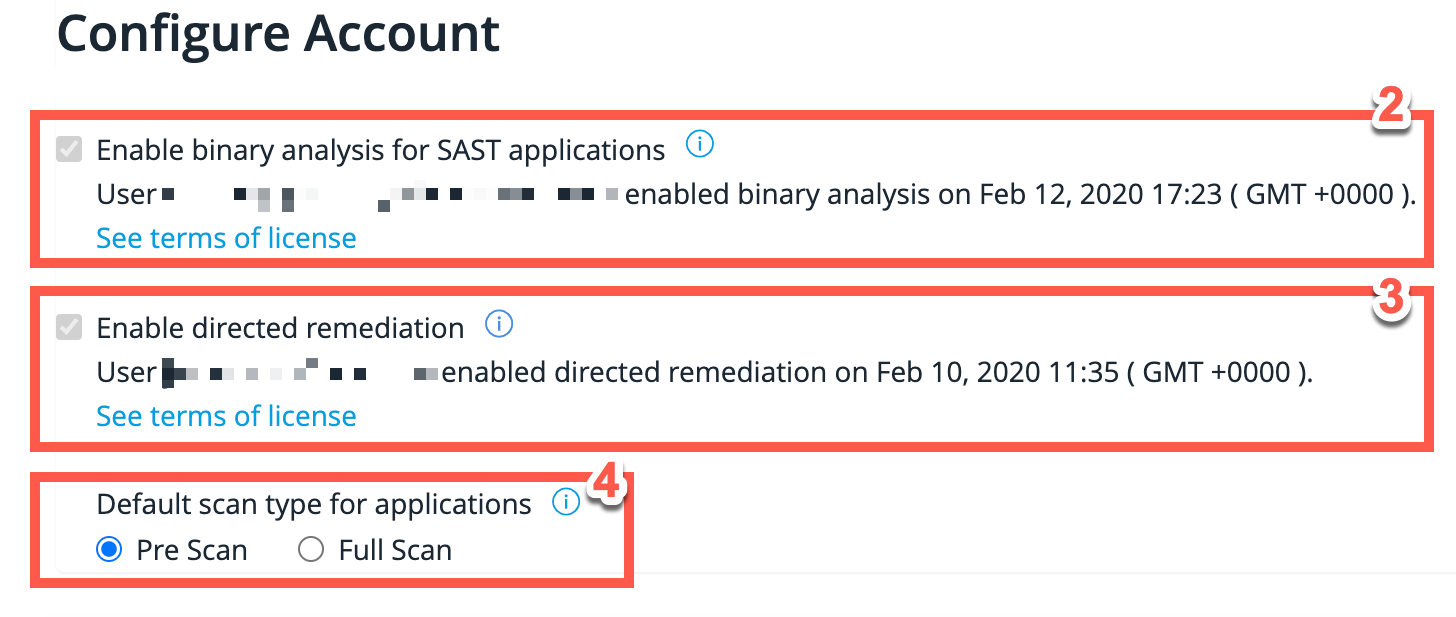
Configuring Your Continuous Dynamic Account
The last section on the Applications tab is Configure Account, which enables a user to make application asset configurations to the account.
| These are one-time non-reversible configurations, so the checkboxes may already be selected. If any configurations are already enabled, the user who enabled this feature is displayed and the timestamp provided, as demonstrated in the image below. |
| Field No. | Configuration Name | Description | ||
|---|---|---|---|---|
2 |
Enable binary analysis for SAST applications |
Enable binary analysis for the account as a whole by clicking on the checkbox. An additional confirmation checkbox now displays. Click the confirmation checkbox to confirm that you want to enable binary analysis and you have the ability to authorize binary scanning for all files that scans will be requested for. The changed configuration now displays the user and date stamp for when the change was made. The change is also reflected in the activity log.
|
||
3 |
Enable directed remediation |
Black Duck can provide directed remediation advice in the form of patches that you can review, download or copy, or use as a basis for your own code. If directed remediation is available for a given vulnerability and has been enabled as described below, the patch will be available to developers, saving them time and effort.
For additional information, please see Using Directed Remediation. |
||
4 |
Default scan type for applications |
The original default configuration is Pre-Scan. If you change the default to Full Scan, an additional confirmation checkbox now displays. Click the confirmation checkbox to confirm and a banner message displays showing that Full Scan has been enabled. The changed configuration now displays the user and date stamp for when the change was made. The change is also reflected in the activity log. If the default scan type is set to Pre-Scan, then when you add an application (without overriding the default) a pre-scan will be run for the new application and if it is successful you can decide whether or not to initiate a Full Scan and consume a license.
|