Deploying the Sentinel Appliance to AWS Using VM Import
| The Sentinel Appliance can no longer be used for SAST and SCA scanning of source code and binaries. This functionality has been deprecated. |
Upload the OVA file to AWS and import as an image
-
Log in to the AWS Console.
-
Upload the OVA file (downloaded as described in Obtaining the Sentinel Appliance) to your S3 bucket.
-
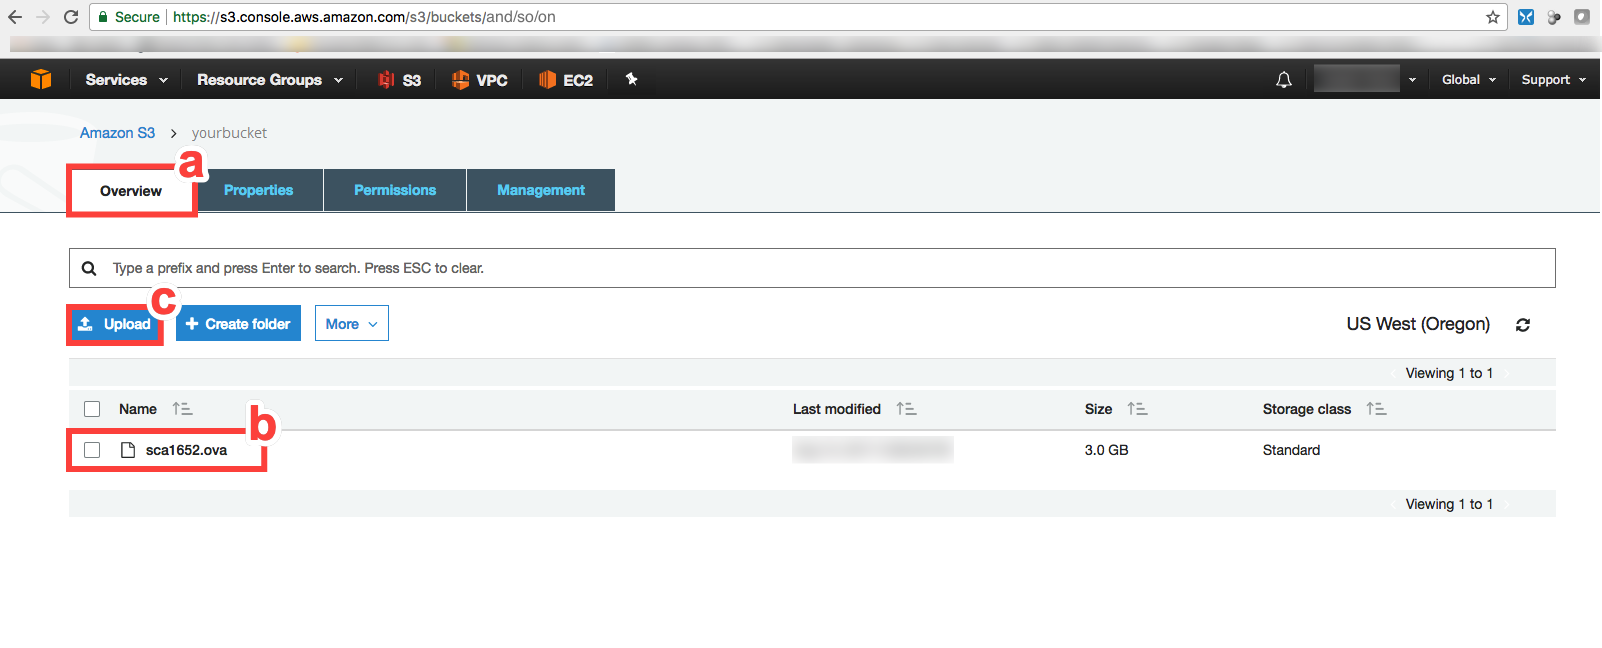
Go to the S3 console in AWS, find your bucket, and select Overview.
-
Select the OVA.
-
Click Upload to upload the OVA to your S3 bucket.
-
-
Import the OVA as an AWS image, as described in What is VM Import/Export? (see particularly the section Import your VM as an Image).
| When following the AWS documentation above, you can reuse the sample JSON provided. You will need to replace the values shown in red with information that is specific to your S3 bucket, OVA file, and so on. |
Examples
This section describes sample files and commands used in Importing a VM as an image using VM Import/Export. We recommend you create these files in your home directory to directly reuse (copy and paste) the commands.
| Any parsing or Python parsing errors encountered when running the sample commands may be a result of the text editor used (for example, Sublime Text). To resolve these issues, we recommend using either nano or Vim. If the errors persist, ensure that you are using Python 3.X or higher. |
Creating a trust policy file
-
Using the AWS Command Line Interface (AWS CLI), create a file named trust-policy.json with the following policy:
{ "Version":"2012-10-17", "Statement":[ { "Effect":"Allow", "Principal":{"Service": "vmie.amazonaws.com"}, "Action":"sts:AssumeRole", "Condition": { "StringEquals":{ "sts:Externalid":"vmimport" } } } ] } -
Run the
create-rolecommand to create a role namedvmimport.Make sure you specify the full path to the location of the trust-policy.json file that you created in the previous step. Include the
file://prefix as shown the following command:aws iam create-role --role-name vmimport --assume-role-policy-document "file://trust-policy.json"Ensure that the role is named as vmimport. Failing to do so may result in a failure during theimport-imagestep.
Creating a role-policy file
-
Using AWS CLI, create a file named role-policy.json with the following policy:
{ "Version":"2012-10-17", "Statement":[ { "Effect":"Allow", "Action":[ "s3:ListBucket", "s3:GetBucketLocation" ], "Resource":[ "arn:aws:s3:::yourinfo" ] }, { "Effect":"Allow", "Action":[ "s3:GetObject" ], "Resource":[ "arn:aws:s3:::yourinfo/*" ] }, { "Effect":"Allow", "Action":[ "ec2:ModifySnapshotAttribute", "ec2:CopySnapshot", "ec2:RegisterImage", "ec2:Describe*" ], "Resource":"*" } ] } -
Run the
put-role-policycommand to attach the role policy to the role you created earlier. Make sure you specify the full path to the location of the role-policy.json file.aws iam put-role-policy --role-name vmimport --policy-name vmimport --policy-document "file://role-policy.json"To create a role, you require the following permissions in AWS: PutRolePolicy,CreateRole(write),GetRole,GetRolePolicy,ListPolicies, andListRoles(read).If you are prompted to run
aws configure, you need to add the following information, such as your AWS keys, etc.:$ aws configure AWS Access Key ID [None]: YOURAWSACCESSKEY AWS Secret Access Key [None]: YOURAWSSECRETACCESSKEY Default region name [None]: YOURREGIONNAME Default output format [None]: ENTER
Creating a containers file from the terminal
-
Create a file named containers.json from your terminal:
[ { "Description": "scaXXX", "Format": "ova", "UserBucket": { "S3Bucket": "YourBucketName", "S3Key": "scaXXX.ova" } } ] -
Using AWS CLI, run the
import-imagecommand to import the OVA:aws ec2 import-image --description "scaXXXX" --license-type BYOL --disk-containers file://containers.jsonSample output:
{ "Status": "active", "LicenseType": "BYOL", "Description": "scaXXXX", "Progress": "2", "SnapshotDetails": [ { "UserBucket": { "S3Bucket": "YourBucketName", "S3Key": "scaXXXX.ova" }, "DiskImageSize": 0.0, "Format": "OVA" } ], "StatusMessage": "pending", "ImportTaskId": "import-ami-example" } -
Run the
describe-import-image-taskscommand to check the status of the import task:aws ec2 describe-import-image-tasks --import-task-ids import-ami-exampleSample output:
The following output is displayed when the command executes successfully.{ "ImportImageTasks": [ { "Status": "active", "LicenseType": "BYOL", "Description": "scaXXXX", "Progress": "28", "SnapshotDetails": [ { "UserBucket": { "S3Bucket": "YourBucketName", "S3Key": "scaXXXX.ova" }, "DiskImageSize": 2807544320.0, "Format": "VMDK" }, { "UserBucket": { "S3Bucket": "YourBucketName", "S3Key": "scaXXXX.ova" }, "DiskImageSize": 476500480.0, "Format": "VMDK" } ], "StatusMessage": "converting", "ImportTaskId": "import-ami-example" } ] }Sample output:
The following is a sample output when the import process completes successfully.{ "ImportImageTasks": [ { "Status": "completed", "LicenseType": "BYOL", "Description": "scaXXXX", "ImageId": "ami-example", "Platform": "Linux", "Architecture": "x86_64", "SnapshotDetails": [ { "UserBucket": { "S3Bucket": "YourBucketName", "S3Key": "scaXXXX.ova" }, "SnapshotId": "snap-example", "DiskImageSize": 2807544320.0, "DeviceName": "/dev/sda1", "Format": "VMDK" }, { "UserBucket": { "S3Bucket": "YourBucketName", "S3Key": "scaXXXX.ova" }, "SnapshotId": "snap-example", "DiskImageSize": 476500480.0, "DeviceName": "/dev/sdf", "Format": "VMDK" } ], "ImportTaskId": "import-ami-example" } ] } -
Log in to the AWS Console.
-
Go to the EC2 service. You should see the AMI you created (
ami-example). You will use this in the next procedure.
Launching an EC2 instance from the AMI image and Cloud-Init
Black Duck is providing the instructions below, but the activity is outside the scope of the license terms. Black Duck warranty, support, and other obligations will no longer apply.
Commands like adduser or useradd can be utilized at this step to generate an appliance user for the purposes of adding required monitoring solutions.
Next, launch an EC2 instance from the AMI image you created in the previous task. Before launching the instance, configure network settings and create an ec2-user for the purposes of monitoring the appliance.
-
Select the AMI image you created.
-
In the top-right corner, click Launch instance from AMI.
-
Enter a name for the EC2 instance.
-
Select an instance type that meets the minimum appliance requirements, as shown in the following table:
RAM free CPU cores Examples SAST appliance requirements
16 GB RAM minimum; 32 GB RAM recommended.
4 CPU minimum; 8 CPU recommended
t3.xlarge, m5.xlarge, m5.2xlarge
DAST appliance requirements
2 GB RAM
2 CPU
t3.small, c5.large
-
Create or select a keypair.
You will not be able to SSH into the appliance. SSH access is only available from the appliance controllers. -
Configure the following Network Settings:
-
Select a VPC.
-
Select a Subnet.
-
Select a Security group that will allow the appliance to scan your resources.
-
-
Next, configure the following advanced details:
Go to User data and either provide commands or upload a script. Note that data or a provided script file will be passed to
cloud-initduring instance deployment.Example configuration:
#cloud-config

runcmd:
 - [ sh, -c, "amazon-linux-extras install -y lamp-mariadb10.2-php7.2 php7.2" ]
 - systemctl start httpd
 - sudo systemctl enable httpd
 - [ sh, -c, "usermod -a -G group2 ec2-user" ]
For more information, refer to the AWS EC2 launch command documentation: Run commands on your Linux instance at launch.